Monday, December 29, 2008

Easing Up a Bit


Whew. We are finally done with the snow and the crazy cooking of the past few weeks has slowed down. I am not cooking for my clients this week and so some of the pressure has lessened. I feel I can cook what I want, what sounds good to me, without worrying about the wow factor.

I made this pasta salad last night for our dear friends Anna and Debbie who just welcomed twins into their lives. I know that when I had both my boys, anyone who brought us food was a total hero. Not having to worry about a trip to the grocery store, let alone cooking, and still being nourished was one of the best gifts someone with a newborn can receive. We decided to eat with Anna and Debbie but I made sure to make enough so that they would have some leftovers. I also brought along a roasted tomato soup, incredible (and incredibly easy)
olive bread, and these brownies. I'm telling you, brownies are a must for a nursing mother.

So, this pasta salad. It is one I have made again and again and never tire of. You allow some raw zucchini, tomato, olives, garlic, feta cheese, olive oil, and dill to marinate together in a nice big bowl. This allows the zucchini to "cook" a bit so it has a nice texture and flavor, but without that chalky rawness or that overcooked slimy-ness. You can just let this bowl sit while you bring the water to a boil and cook the pasta. I just scoop the pasta out and directly into the bowl where the veggies are marinating so I don't have to wash a colander. Plus a little starchy water from the pasta eliminates the need for too much olive oil.


I once read somewhere that pasta salads are best served room temperature. I couldn't agree more. If they are too cold, the pasta seems to get extra starchy and that is all you taste. There is a lot of wonderful savory flavor here so please don't kill it in the fridge! It can be made a day in advance, refrigerated, then brought to room temperature for an hour or so.


Penne with Greek-Style Vegetable Marinade

Adapted from Main Course Vegetarian Pleasures

Serves 6-8


1/3 cup olive oil

3 garlic cloves, minced or pressed

1 medium zucchini, halved lengthwise and very thinly sliced

2 tomatoes, seeded and finely diced

12 Kalamata olives, pitted and chopped

6 scallions, very thinly sliced

2 tbsp. finely chopped fresh dill

1 cup finely diced feta cheese

Salt and pepper

1 lb. penne or rotini


1. Combine all the ingredients except the pasta and the salt in a large bowl. Toss and let sit for at least 30 minutes, or up to 4 hours.


2. Bring a large pot of water to a boil. Salt the water and add the pasta and cook until al dente, about 10 minutes. Carefully scoop the pasta out and add to the bowl with the veggies. Add salt and pepper to taste and serve warm or at room temperature.

Wednesday, December 24, 2008

Happy Anniversary


41 years ago today, my parents got married. Yes, on Christmas Eve. My dad was a medical resident at the time and he got almost no time off. They wanted to have a wedding (which they did at the Plaza in NYC), and they wanted to have a honeymoon and so Christmas Eve it was. My family is Jewish so there was no conflict of interest in terms of the guest list. What they didn't take into account was how they were going to celebrate in the coming years.

As a child, my parents never went out on their anniversary. Nothing, except Chinese restaurants and hotel restaurants, was open. And it wasn't even Christmas eve for us because we didn't celebrate Christmas. They never complained about it but I think the fact that they didn't get to go out for their anniversary probably always bothered them.


Once I started cooking, even in the very early years when my repetoire was extremely limited, I decided to make dinner for them each year. As I got older and more experienced, I would put together delicious and time consuming menus for them to honor another year of their marriage. Once both I and my middle brother married non-Jews, their anniversary became our family celebration of the holidays. We would all gather together, give gifts, and eat the meal I had made.


This year, it was looking like, up until 5 minutes ago, we weren't going to be able to celebrate together at all. My dad, although he is retired, occasionally does a little work in Walla Walla which is a small town in the heart of Washington wine country. With all of our crazy snow we have had in the past two weeks, none of us were sure he was going to be able to get home. None of us was sure people were going to be able to risk the roads to get to our house.


But I just got a call from my mom. Not only is she on the road but she is on the way to pick up my dad at the airport. Amazingly, he got on a flight and it looks like it is going to actually take off. I can't tell you how happy I am that we will all be together. (We will actually be missing my middle brother and his family as he celebrates at his in-laws.)


I made this Apricot Cranberry Linzer Tart last night with the idea that positive thinking (and baking) would actually allow this evening to come together. Linzer Tarts are a favorite of both my parents and this one looked especially good to me. I am not going to share the recipe because a) we haven't tasted it yet, and b) I found the crust to be exceptionally finicky to work with. It needs some tweaking. But it looks pretty so I thought I would share the photo.


Happy Holidays to everyone out there!

Sunday, December 21, 2008

Just One More...

Cookies. I know. They are everywhere and unavoidable at this time of year. Kind of like Halloween candy right around Halloween. Our local UPS store had Halloween candy this year. Yes, the UPS store.

Anyway, you may be sweeted out, or at least cookie'd out by now, but I thought I would give one more cookie recipe before we hit 2009. Ginger cookies suffer from never quite being right, at least in my book. I want them to be just the slightest bit chewy, definitely not crunchy, and I want the flavor to be very warm with lots of molasses and spices. So often they suffer from being too flat and with just a very sweet taste instead of the complexity that good spices bring.


I think Ina Garten has come pretty darn close. These cookies have lots of candied ginger in them which gives them a really nice spice and they have a good dose of molasses too. They are not for the faint of heart, but if you love ginger, these may be the ones for you.


Let's talk about ginger. Most grocery stores will have candied ginger in the baking aisle. It can be very fibrous and difficult to cut (and you want really small pieces in these cookies) so, if you can, see how soft it is and get the freshest bag possible. If you live near a Trader Joe's, by all means get your ginger there. It comes in little cubes and is much easier to cut and stores much better than the slabs.


Ultimate Ginger Cookie

Adapted from
Barefoot Contessa Cooks at Home
Makes about 16 cookies


Just like for the party I catered, I rolled 1/3 of these in red sanding sugar, 1/3 in green sanding sugar, and 1/3 in vanilla sugar. You can, of course, just use regular sugar.
I did follow Garten's advice of lining the sheets with parchment paper because there is no butter in the recipe.

2 1/4 cup flour

1 tsp. baking soda

2 tsp. ground cinnamon

1 1/2 tsp. ground cloves

1/2 tsp. ground nutmeg

1/2 tsp. ground ginger

1/4
tsp. kosher salt

1 cup dark brown sugar, lightly packed

1/4 cup vegetable oil

1/3 cup unsulfured molasses

1 egg, at room temperature

1 1/4 cups chopped crystallized ginger (6 ounces)

Granulated sugar, for rolling the cookies


Preheat the oven to 350 degrees. Line 2 cookie sheets with parchment paper.


In a large bowl, sift together the flour, baking soda, cinnamon, cloves, nutmeg, ginger, and salt ad then combine the mixture with a spoon. In the bowl of an electric mixer fitted with the paddle attachment, beat the brown sugar, oil, and molasses on medium speed for 5 minutes. (DN: Measure the oil first, then the molasses. That way, the molasses will just run right out of the measuring cup, because it has been greased by the oil.) Turn the mixer to low speed, add the egg, and beat for 1 minute. Scrape the bowl with a rubber spatula and beat for 1 minute more. With the mixer still on low, slowly add the dry ingredients to the bowl and mix on medium speed for 2 minutes. Add the crystallized ginger and mix until combined.


Scoop the dough with 2 spoons or a small ice cream scoop. With our hands, roll each cookie into a 2 inch ball and roll the ball in the sugar of your choice. Place them on a cookie sheet and bake them for exactly 13 minutes. The cookies will be cracked on the top and soft inside. Let the cookies cool on the sheets for a minute or two, then transfer to wire racks to cool completely.

Saturday, December 20, 2008

Problem Solved!

(While these cookies may not look "perfect", I think they are just that because my 4 year old decorated them.)

Thank goodness for the people at
Cook's Illustrated. Do you know this magazine? It comes every other month and is very slim because it has no advertising. It also doesn't have color photographs or super trendy recipes. What it does have is tested-to-death recipes for relatively basic things. It also has equipment and ingredient testing. It's a great place to read about whether $200 is a good investment for a saute pan (turns out - yes, but they also give good moderate priced recommendations.) The magazine is anything but snobby.

I have had a like/dislike relationship with
Cook's Illustrated. There is a lot of meat in it's pages so 75% of the recipes are ones I don't use. Sometimes the recipes are too basic for me - I most often looking to wow my clients after all. But the things I have made turn out great and I appreciate all the testing they do and the explanations of what they do and why. I have bought some equipment on their recommendation and have not been sorry. And now this cookie recipe.

I have written
here before about how much I dislike making holiday cookies. After reading that post, my sister-in-law passed on her recipe (which she got off All Recipes), saying that she never had problems with the dough sticking. She gave me a couple for Randy to try and he didn't really like the flavor. (Sorry Amy.) I thought I was going to have to struggle with my dough again when I got the Holiday Baking issue of Cook's Illustrated. There, in among lots of recipes I would like to try, was a recipe for Easier Holiday Cookies.

The ingredients are slightly different than my very-tasty-but-pain-in-the-neck recipe. The biggest difference is that they stress the need for superfine sugar. I always use superfine in my baking but if you don't, you can easily find it in the grocery store (C & H makes it in a milk carton). If you don't want to buy different sugar, you can put regular sugar in the food processor for 20 seconds. The method here is quite different. And the result is
fabulous. Amazing rich buttery taste and no sticking! This will forever by my go-to recipe for this type of cookie. Don't get me wrong, there is still quite a bit of fuss with this type of cookie, but when the result is this good and pain-free, I don't really mind.

Glazed Butter Cookies

Holiday Baking
from Cook's Illustrated
Makes 3 dozen 2 1/2 inch cookies


They give a recipe for frosting which I didn't use - I just feel back on
my trusted one. They also give you other options of what you can do with this dough, like Toasted Almond Cookies with Honey Glaze. Yum.

2
1/2 cups flour
3/4
cup superfine sugar
1/4
tsp. salt
2 sticks unsalted butter, cut into 16 pieces, cool room temperature

2 tsp. vanilla extract

2 tbsp. cream cheese, cool room temperature


1. In bowl of stand mixer fitted with flat beater, mix flour, sugar, and salt on low speed until combined, about 5 seconds. With mixer running on low, add butter 1 piece at a time; continue to mix until mixture looks crumbly and slightly wet, about 1 minute longer. Add vanilla and cream cheese and mix on low until dough just begins to form large clumps, about 30 seconds.


2. Remove bowl from mixer; knead dough by hand in bowl for 2-3 turns to form large cohesive mass. Turn out dough onto countertop; divide in half, pat into two 4-inch disks, wrap each in plastic, and refrigerate until they begin to firm up 20-30 minutes. (Dough can be refrigerated up to 3 days or frozen up to 2 weeks; defrost in refrigerator before using.)


3. Adjust oven rack to middle position; heat oven to 375 degrees. Roll out 1 dough disk to even
1/8 inch thickness between 2 large sheets of parchment paper; slide rolled dough on parchment onto baking sheet and chill until firm, about 10 minutes. Meanwhile, repeat with second disk.

4. Working with first portion of rolled dough, cut into desired shapes using cookie cutters and place shapes on baking sheet, spacing them about 1
1/2 inches apart. Bake until light golden brown, about 10 minutes, rotating baking sheet halfway through baking time. Repeat with second portion of rolled dough. (Dough scraps can be patted together, chilled, and re-rolled once.) Cool cookies on rack to room temperature. Glaze and decorate as desired.

Thursday, December 18, 2008

Want Some Dinner?


It's snowing in Seattle. If you are not from around here, that may not sound surprising. You look at a map of the United States and see that Seattle is north. North like Montana, North Dakota, Minnesota, Maine, etc. It snows in all of those places but it doesn't usually snow here. Our fair city is in the middle of two mountain ranges, so the clouds come off the Pacific, dump a bunch of snow in the Olympic mountains (the range to the west of us) and warm up as they move over Seattle. We get a bunch of rain and then the clouds move East and dump a bunch of snow in the Cascade range. At least, this is how I used to explain it to college friends when they asked me if we got a lot of snow.

Because we are usually snow-less in Seattle, and because this is a very hilly city, snow wreaks havoc on us when it does come. I think our entire city has three snow plows so the only roads that get cleared are the highways and very major arterials. You are a fool to try and drive - or you are my husband who pooh-poohs all the fuss and will most likely get stuck downtown tonight.


Thursdays are a food delivery day for me. I was proactive yesterday (as I always try to be) and made everything but the salad dressing for tonight's dinner. Because I will not be delivering, I now have enough chili and cornbread to feed a small army. Any takers?


Let's talk about cornbread. Cornbread is one of those things that used to be a disappointment for me. I love the idea of it, but always found the actual thing to be dry and tasteless. Then I found the recipe in the original Moosewood cookbook and decided that cornbread was a necessity when making things like chili or black bean soup. From there, I moved on to the recipe in the
Joy of Cooking which is that much more moist and the one I still use when I want something more on the plain side. If you want to jazz it up, make this one. It is incredibly moist and rich and savory. I use three (seeded) jalapenos which gives it a little kick but not so much that it hurts the tongue. This cornbread freezes beautifully so make a whole batch even if you don't plan to eat it all in one sitting. Also, I have made it in muffin tins and mini muffin tins and it turns out great.

Jalapeno Cheddar Cornbread

Adapted from
Barefoot Contessa at Home
Makes 12 very large pieces


3 cups flour

1 cup yellow cornmeal

1/4 cup sugar

2 tbsp. baking powder

2 tsp. kosher salt

2 cups milk

3 eggs, lightly beaten

2 sticks butter, melted
and cooled slightly
8 oz. Cheddar cheese, grated and divided

3 scallions, chopped, plus extra for garnish

2-3 seeded and minced jalapeno peppers


Combine the flour, cornmeal, baking powder, and salt in a large bowl. In a separate bowl, combine the milk, eggs, and butter with a whisk. With a wooden spoon, stir the wet ingredients into the dry until most of the lumps are dissolved. Don't overmix! Mix in 2 cups of the grated cheddar, the scallions, and jalapenos, and allow the mixture to sit at room temperature for 20 minutes.


Meanwhile, preheat the oven to 350 degrees. Grease a 9x13x2 baking pan.


Pour the batter inot the preapred pan, smooth the top, and sprinkle with the remaining grated Cheddar and extra chopped scallions. Bake for 30-35 minutes, or until a toothpick comes out clean. Cool and cut into large squares.

UPDATE: Do not, under any circumstances, decide to reheat this bread in the oven. We ended up taking the whole dinner to a friends' house and decided to warm up the bread. I stuck the whole pan in a 350 oven for about 15 minutes and it just turned into soup in the middle. I think that much butter, cheese, and milk wasn't meant to be reheated.

Tuesday, December 16, 2008

Something Savory


When we lived in London, I had the amazing opportunity to take a couple of cooking classes. Most were done at a delightful store called Divertimenti in my favorite neighborhood of Marleybone. They had a rotating roster of instructors, one of whom was Celia Brooks Brown - an American living in London who has written a number of vegetarian cookbooks - and another of whom was Richard Bertinet, a charming Frenchman who has just published a ground-breaking book on bread. I got to take classes with both of them.

The folks at Divertimenti really knew what they were doing. They had a lovely kitchen classroom downstairs from the main part of the store. The instructors used many different kitchen tools, talked about how great they were, and then encouraged us to use our 10% off coupons to buy said tools. For example, Ms. Brown used a square non-stick pan to make a Japanese omelet for a futomaki roll. Even though I could see right through this ruse, I somehow ended up with a square non-stick pan. (True confession: I love this pan. It does not have a silicone coating so I have used it blissfully through all the controversy over non-stick. If I could, I would buy another one in a heartbeat, but I can't seem to find this German brand in the States.)


I also took some classes at Leith's which was in my neighborhood of Kensington and is an old and nationally famous cooking school. Kind of the English equivalent of the CIA here. These classes were all about the cooking and not at all about the equipment. I took an amazing chocolate making class where we learned how to make chocolate truffles in molds so they look incredibly professional. Thankfully, I learned to temper chocolate there, otherwise I may never have attempted it. (It is still one of my least favorite things to do in the kitchen.)


The other class I took at Leith's was called Vegetarian for the Holidays. Because I am a decent cook, and I have been vegetarian since I was sixteen, I didn't find that I learned all that much at the Divertimenti classes. I enjoyed them, but didn't learn much. Leith's was another story. In three hours time, the chef whipped up seven dishes from start to finish without so much as breaking a sweat. I learned that it was possible to like parsnips (in an incredible dish garnished with kumquats) among many other things. A month or so later, I picked up their book entitled
Leith's Vegetarian Bible.

I must confess, I haven't used the book all that often. I don't like how it is laid out (by ingredient, rather than by course), so each time I reach for it, I end up just putting it down. But I have been in a bit of rut lately and wanted to dive into my second stringers. I am so glad I did. This dish was pretty outstanding. And not just for this dinner - this is a new outlook on risotto for me. I remember reading in one of Deborah Madison's cookbooks that she doesn't like risotto unless something interesting has been done with it. Just a puddle of it in a bowl doesn't do it for her. I actually do like a puddle of risotto, but these wedges made me LOVE risotto. This technique is great - I had no wedge breakage as I have when I have tried to make croquettes. The actual risotto in this recipe is delicious but I plan to do with another type in the not too distant future.


Fennel and Brie Risotto Wedges
Adapted from
Leith's Vegetarian Bible
Serves 8


I suggest you heat 6 cups of vegetable stock to make the risotto, although you may not need all of it. (Original recipe only called for 3). I recommend you freeze the Brie for about 30 minutes to make cutting the rind off a little easier. I used two Pyrex pie plates for the egg and the breadcrumbs. I made these early in the day and then reheated them in a 350 degree oven for about 10 minutes. Great for a dinner party!


2 fennel bulbs

1 tbsp. olive oil

2 tbsp. butter

1 onion, thinly sliced

1 lb. arborio rice

6 cups vegetable stock

Grated zest and juice of 1 lemon

Salt and freshly ground black pepper

2 oz. Parmesan cheese, freshly grated

8 oz. Brie cheese, rind removed and cut into
1/2 inch pieces
Flour

3 eggs, beaten

Breadcrumbs

Olive oil, for shallow frying

Fresh fennel tops for garnish


1. Discard any damaged outer leaves from the fennel and cut each bulb in half. Remove the cores and reserve the feathery tops Chop the fennel very finely.


2. Heat the vegetable stock over medium heat in a medium saucepan.


3. Heat the oil and butter in a large shallow saucepan and add the fennel and onion and a healthy pinch of salt. Cover and cook over a low heat for 20-25 minutes until soft but not colored.


4. Add the rice to the pan and stir to absorb the buttery juices. Add teh stock a little at a time, stirring continuously and allowing the stock to become absorbed between each addition, until the rice is tender - this will take about 20-30 minutes. Stir in the lemon zest and juice and season with salt and pepper.


5. Carefully fold in the Parmesan and Brie cheeses. Allow to cool.


6. Line a baking sheet with parchment paper. Turn the cooled risotto out on the paper and gently form it into a circle about 1 inch thick. Make sure it is as even as possible. Chill in the refrigerator at least 4 hours or overnight. If you do leave it in overnight, cover the circle with plastic wrap.


7. Cut the cold risotto mixture into 8 wedges and sprinkle each side of each wedge with flour. In a wide shallow bowl, beat the eggs and in another wide shallow bowl, scoop out 1 cup of breadcrumbs. (You may need more.)


8. Heat a medium non-stick frying pan over medium heat. Add enough oil to coat the bottom of the pan and fry the risotton wedges for 2-3 minutes on each side until hot, brown, and crisp. You can also fry the edges if you like. Drain on paper towels and sprinkle with a little salt. Serve hot, garnished with chopped fennel fronds.

Sunday, December 14, 2008

Catering a Party

Here is the good news about the party I catered on Friday. I remembered all the food. I got there on time. I remembered all the plates and serving pieces. I got all the food done on time. I got home on time to relieve the babysitter. Everything looked great. I remembered my camera.

Here is the bad news about the party I catered on Friday. The camera didn't have the memory card in it. Doh!


So, I have not one photo from the party. I can tell you what I made (and I will!), I can give you an awesome recipe (and I will!), but I cannot show you what anything looked like. Bummer.


All in all, I have to say I was really proud of the work I did. I put this whole thing together in about two weeks and managed to get everything done while still cooking for my regular clients. It gave me a lot of confidence for next time. When I won't forget the memory card.


(Note: The party hosts ordered a ham and I made everything else.)


Appetizers


Smoky Cashews

Buttermilk Peppercorn Dip with Crudite and Vegetable Chips

Parmesan and Thyme Crackers

Goat Cheese and Pistachio Stuffed Dates


Sides


"Grown Up" Mac and Cheese

Spicy Sweet Potatoes with Lime with Yogurt Dipping Sauce

Green Salad with Pears, Candied Nuts and Pomegranate

Pea Salad with Radishes and Feta Cheese

Blue Cheese Popovers


Desserts


Pecan Pie Bars (I dipped half in chocolate)

Gingersnaps (I rolled
1/3 in red sanding sugar, 1/3 in green sanding sugar, and 1/3 in vanilla sugar)
Chocolate Peanut Toffee


Some of these recipes were new to me, some were old favorites. I figured I would share the recipe for the sweet potatoes since they are something I have now made three times and have had raves all three times. They are simple and fill the house with an amazing aroma. Healthy too! I served these on a large white platter (I tripled the recipe) with a silver bowl of lime wedges and a silver bowl of the dipping sauce at the bottom. It looked great.


Spicy Sweet Potatoes with Lime

Adapted from Martha Stewart's
The New Classics
Serves 6


4 medium sweet potatoes (about 2
1/2 pounds), scrubbed well
2 tbsp. olive oil

2 tsp. ground cumin

1 tsp. hot paprika (
DN: I used pimenton, or smoked paprika)
1 tsp. ground ginger

Coarse salt and freshly ground pepper

Lime wedges for serving

Yogurt Dipping Sauce (recipe follows)


1. Preheat oven to 400 degrees. Heat a baking sheet in the oven until hot, about 15 minutes. Meanwhile, slice the sweet potatoes in half lengthwise; slice each half into three wedges. Place in a medium bowl and toss with the oil, cumin, paprika, and ginger. Season with salt and pepper.


2. When the baking sheet is hot, remove from the oven. Arrange the sweet potatoes in a single layer on the sheet. Return to the oven; cook until the potatoes are crisp and golden on the bottom, about 15 minutes. Turn and continue cooking until golden all over, about 15 minutes more.


3. Remove from the oven; season with salt and pepper. Serve with limes and the sauce.


Yogurt Dipping Sauce

Makes about 1 cup


1 cup plain yogurt (
DN: Lowfat is fine.)
3 tbsp. roughly chopped cilantro

2 tbsp. chopped toasted walnuts

1 tbsp. fresh lime juice

1/2
tsp. ground cumin
Coarse salt


Combine all the ingredients in a small bowl. Cover with plastic wrap, and refrigerate until ready to use. Can be made 2 days ahead.

Thursday, December 11, 2008

100 for 100

This is my 100th post! I thought I'd make a list of 100 things I like to eat. In the old days of being a vegetarian, people used to always ask me - incredulously - "What do you eat?" Of course, the answer is not what I (or any vegetarian) eats, but what I don't. For me, there are four things I don't eat. Red meat, poultry, the other white meat, and fish. Every single other food out there in the entire world is a possibility for me. It took me about 5 minutes to come up with this list and I could easily have come up with another 100.

Happy 100 to me!


1. Chickpeas

2. Lentils

3. Black beans

4. Pinto beans

5. Edamame

6. Black eyed peas

7. White Rice

8. Quinoa

9. Farro

10. Bulgur

11. Millet

12. Couscous

13. Pasta

14. Brown rice

15. Tofu

16 Tempeh

17. Seitan

18. TVP

19. Eggs

20. Parmesan cheese

21. Manchego cheese

22. Membrillo

23. Montrachet

24. Miso

25. Seaweed

26. Udon noodles

27. Soba noodles

28. Rice noodles

29. Bean thread noodles

30. Ginger

31. Galangal

32. Lemongrass

33. Chiles

34. Cilantro

35. Parsley

36. Broccoli

37. Carrots

38. Celery

39. Onions

40. Garlic

41. Red and Yellow Peppers

42. Green beans

43. Zucchini

44. Corn

45. Broccoli rabe

46. Asparagus

47. Artichokes

48. Winter squash

49. Mushrooms

50. Thyme

51. Rosemary

52. Mint

53. Sage

54. Chives

55. Oregano

56. Basil

57. Potatoes

58. Sweet potatoes

59. Tomatoes

60. Avocados

61. Leeks

62. Shallots

63. Scallions

64. Peas

65. Bread

66. Peanut butter

67. Jam

68. Honey

69. Olive oil

70. Balsamic vinegar

71. Nuts

72. Seeds

73. Butter

74. Chocolate

75. Yogurt

76. San Pelligrino

77. Syrah

78. Hummus

79. Baba Ghanouj

80. Feta cheese

81. Felafel

82. Frozen yogurt

83. Pistachios

84. Marcona almonds

85. Caramel

86. Gnocchi

87. Beets

88. Arugula

89. Ricotta cheese

90. Watermelon

91. Nectarines

92. Apples

93. Raspberries

94. Blueberries

95. Pineapple

96. Cantelope

97. Pears

98. Sundried Tomatoes

99. Tahini

100. Coconut Milk

Wednesday, December 10, 2008

Coincidence

Do you have a favorite small world or deja vu story? Up until recently, my favorite was this:

About fifteen years ago, I was walking around Greenlake which is a great little lake right in the middle of Seattle. It has a 3 mile loop around it - perfect for walking and running. I passed a woman who looked a lot like
Debbie Armstrong. Deb won a gold medal in skiing in 1984 and also worked at the camp my brothers and I went to on Lopez Island. As I passed this look-alike, I wondered how she was doing. I had heard she was living in New Mexico and was doing a lot of wonderful charity work. Not ten minutes later, I passed... wait for it ...Deb Armstrong. No, it was not the same look-alike, it was her. I couldn't even say hi I was so stunned. And that day I went and bought a lottery ticket (I didn't win.)

Now this story has become my favorite. Six months ago, I was doing my regular food delivery. One of my clients is never home when I deliver so I have keys to their house. I let myself in and started putting everything away. I realized I forgot something in my car and went out to get it. When I got back to the door, it was locked. Although I had unlocked the deadbolt and the door knob to go in, the door knob never unlocks without a key - a fact I didn't know until that moment. Their keys and, more importantly
my keys, were in the house. Immediately my mind started racing - how was I going to get home to relieve the babysitter?

At that moment, the next door neighbor pulled in to her driveway. I went up to the car, introduced myself, told them I brought food to E and J and did she by chance have a key to their house? She immediately asked, "What do you mean you bring food to them?" I had to switch from panic mode to selling myself and my business mode very quickly. I gave her my (very short) pitch and we exchanged emails so I could send her more information. Then, very kindly, she and two of her daughters walked around the house with me to see if E and J had hidden a key somewhere (they hadn't), and she also walked me over to another neighbor's house to see if they had a key (they didn't). Fortunately, I did have my cell phone and I was able to get in touch with E - after 20 panic stricken minutes - and was able to let myself in.


Meanwhile, my husband was working on putting a brunch together with a Naval Academy classmate who lives in Seattle. We had been going back and forth on dates and had finally settled on a Saturday. Two days after my mini panic attack.


The next day, I sent this nice neighbor an email telling her all about my business. She, after having been cc'ed on the emails from Randy, immediately recognized my last name and put two and two together. Yes, this nice and helpful neighbor - whose house I have been driving by for two and half years - was none other than the wife of a college classmate of my husband's and my brunch date two days after "meeting" her. There are ways that this story could have been
kind of weird (if, in talking about my business, we had realized that her neighbors were my clients - or if I had gotten to talking with her outside one day, and realized that our husbands had been classmates), but the way it all worked out was very weird. I should have bought a lottery ticket - I'm sure I would have won.

Now, the reason I tell this long story is so that I can tell you this wonderful couple has asked me to cater a Christmas party for them at their beautiful house. Friday. For 30 people. I am knee deep in food and wondering how I will get it all done (in addition to delivering food to my regular clients.) But I will. I always do. More on the menu next time.

Sunday, December 7, 2008

Not Your (or My) Mother's Stuffed Cabbage


When I was a kid, my mom cooked a lot of 1970's fare. Meatloaf, spaghetti and meatballs, corned beef and cabbage, bbq'ed chicken, stuffed cabbage. As my brothers and I grew up and really started to appreciate food (she is a good cook), she got more adventurous. She started reading cookbooks and branching out. Once I became a vegetarian (at age 16), she branched out even farther and started making more ethnic food and eventually became a vegetarian herself.

All along, my dad never complained. He is an enthusiastic eater and loved whatever she made. I think if you asked him, though, he would love to have one of those old dishes again. Especially stuffed cabbage. Her recipe was sweet, sour, and substantial. Cabbage parcels stuffed with a meat and rice mixture flavored with lots of cinnamon, and all bathed in a piquant tomato sauce. It makes me laugh to think that she used to take the meat out of the cabbage so I didn't have to eat the cabbage part. Now it would be the other way around.


Up until recently, I never attempted a vegetarian stuffed cabbage recipe. Perhaps I was haunted by the memories of that meat mixture, or perhaps I was just lazy. Sometimes I am funny that way. I'll spend hours making a cake but the idea of making a filling and then preparing a vegetable wrapper, and then doing the actual wrapping just sounded like too much. Until the time I actually tried it and realized that it is easy and makes for a delicious dinner.


For this recipe you use collard greens instead of cabbage. Really, any of the leafy greens make good wrappers. I removed the vein in each leaf and used two roughly same-sized halves, slightly overlapped, for each roll. That way, you can make dinner sized parcels and don't have to worry about the filling spilling out. As yummy as the filling is here, the sauce is what makes it. If you have left over, it makes a delicious salad dressing or sauce for tofu, or really just about anything.


Middle Eastern Lentil Rice Rolls with Lemon Tahini Sauce

Loosely adapted from
The New Whole Grains Cookbook
Serves 4


Filling

1/2
cup Le Puy lentils (can use plain brown lentils)
1/2
cup short grain brown rice
1 small onion, chopped

2 garlic cloves, minced

olive oil

1/2
bunch parsley, chopped
Salt and freshly ground black pepper

Pinch of cayenne

1 tsp. dried oregano

2 tbsp. fresh lemon juice

1 tbsp. mild vinegar (such as apple cider)

2 bunches large-leaved collard greens, about 24 leaves


Sauce

1/2
cup tahini
2 garlic cloves, roughly chopped

1/2
cup lemon juice
1/4
cup water
1/2
tsp salt, or more to taste

Place the lentils in a small saucepan and cover with cold water by 2 inches. Bring to a boil and reduce heat slightly so the water stays at a gentle boil. Cook lentils until tender, but not mushy, about 20 minutes. Taste to make sure they are done. Drain and set aside.


Bring a medium size pot of water to boil. Add about a teaspoon of salt and then add the rice. Give it a good stir, then allow to cook, keeping the water at a boil, until done but with a little bit of a bite, about 30 minutes. Drain and set aside.


Place a medium saute pan over medium heat. Add just enough olive oil to cover the bottom of the pan and add the onion. Cook until beginning to soften, then add the garlic. Cook for 3 minutes, then add a good pinch of salt, the cayenne, the oregano, and a couple of grinds of black pepper. Cook 1 minute. Add the parsley, give it a good stir and remove from the heat. In a bowl, mix the saute with the rice, lentils, lemon juice and another good pinch of salt. (
This mixture can be made one day ahead and refrigerated, covered.)

Bring a large pot of water to a boil, and add the vinegar and a teaspoon of salt. Cut the collards in half along the stem, removing the stem and discarding it. Drop the leaves in the boiling water and stir for 2-3 minutes, until softened and bright green. Drain and rinse in cold water immediately. Shake each leaf off and lay on a kitchen towel to blot dry.


Take two roughly same-sized pieces and overlap them slightly. Scoop a couple of tablespoons of the rice mixture and place right where the leaves overlap. Fold the sides in and then roll up the leaves, cigar-style. Place on a serving platter seam-side down. Serve at room temperature.


For the sauce, put the tahini, garlic, and lemon juice in the work bowl of the a food processor. Process until smooth, stopping and scraping down the sides as necessary. Add the water and the salt and process to make a pourable sauce. Serve with the rolls.

Friday, December 5, 2008

Back to Basics


Most people fall into one of two camps. Chocolate or vanilla. When you were a kid and you got to have a milkshake at McDonald's, did you choose chocolate, vanilla, or strawberry? I remember wondering why on earth anyone would order anything but chocolate. I was probably 7 years old.

Times haven't changed much. While I never go to McDonald's (my kids don't even know what it is, but they do recognize the Starbucks logo - even the 22 month old says, "Coffee!"), I still always choose chocolate if it's an option. My husband would always choose vanilla and it looks like my older son is following in his footsteps. My baby will eat anything sweet at any time until we take it away from him.


In my view, oatmeal raisin cookies are the vanilla of the cookie world. My 7 year old self and my 38 year old self wonder why anyone would choose an oatmeal raisin cookie when you can have chocolate chip. But, as a personal chef, I realize that I am cooking for an audience. Not everyone has the same love affair with chocolate that I do. Plus Randy specifically requested oatmeal raisin cookies after he had a particularly bland one recently.


When making something iconic like a cookie, I typically look around and try to find a recipe that takes a classic and makes it more interesting. In the past I have made oatmeal raisin cookies that have 5 different spices in them but truthfully, they are a little much. They lose the simple and straightforward flavor and become something complicated. I figured I'd go back to basics with this one and see. Verdict? Delicious. Exactly what an oatmeal raisin cookie should taste like. A hint of cinnamon, a hint of caramel from the brown sugar, and pure sweetness from the raisins. The texture is great too, moist and chewy throughout. I would still pick chocolate chip, but this one is pretty good.


"Vanishing" Oatmeal Raisin Cookies
Adapted from the top of the Quaker Oat container

Makes 2-3 dozen


2 sticks butter, softened

1 cup firmly packed light brown sugar

1/2 cup granulated sugar

2 eggs

1 tsp. vanilla

1 1/2 cups flour

1 tsp. baking soda

1 tsp. cinnamon

1/2 tsp. salt

3 cups old fashioned oats

1 cup raisins


1. Heat oven to 350 degrees.


2. Beat together butter and sugars until creamy, about 4 minutes on medium speed.


3. Add eggs and vanilla; beat well.


4. Combine flour, baking soda, salt and cinnamon in a mixing bowl. Add to butter mixture and mix until combined.


5. Stir in oats and raisins and mix well.


6. Drop by rounded tablespoons onto ungreased cookie sheet.


7. Bake 10-12 minutes or until golden brown.


8. Cool 1 minute on cookie sheet; remove to wire rack.

Tuesday, December 2, 2008

Seitan Bourguignonne


This is a tricky photo. Does it look like really amazing vegetarian Bourguingonne or does it look like, well, something your pet threw up? If it looks like the latter to you, I deeply apologize because this dish is truly delicious. If it looks like the former, and if you are up for a challenge, I give you Seitan Bourguingonne.

This is not an "everyday" dinner. Reserve this for a dinner party or for when your favorite vegan comes into town. It isn't difficult by any stretch, there are just a lot of steps. But all of those steps (marinating and roasting ingredients separately) lend this stew amazing complexity. I have served it exclusively to carnivores and they are always amazed at how incredibly flavorful it is and how satisfying.


Let's talk about seitan. Seitan is made from wheat and it has a very distinctive "meaty" texture - that is, very firm and kind of chewy. You can usually find it where you would find tofu in your grocery store or, if you have the time, you can make it yourself. (I have never made it myself...) It is very high in protein and very low in fat and really lends itself to dishes like these. When you take it out of the package it may remind you of dog food, but please do not let that dissuade you - it's an amazing product.


The original recipe calls for an alarming amount of soy sauce which I have changed in the below version - even for me it was just too salty. Also, I have noted that which can be made in advance. The author says you can freeze the whole stew for several months and it will be just as good as the day you make it. I made this with Mashed Potatoes and Parsnips (adapted from the same cookbook) and Salad with Pomegranates and Walnuts and a Raspberry Walnut Vinaigrette.


Seitan Bourguingonne

Adapted from
The Voluptuous Vegan
Serves 4


If you have three racks in your oven, you can roast the seitan, the peppers, and the mushrooms all at the same time.


1/4
cup shoyu or other soy sauce

1/4
cup vegetable stock

2 tsp. mellow barley miso

2 1/2 cups dry red wine

1/2
cup mirin (sweet Japanese sake)

1/4
cup balsamic vinegar

1/4
cup canola oil

3 garlic cloves, minced

1 bay leaf

3/4
lb. seitan, cut into 1 inch cubes

1/2
oz. dried porcini mushrooms

3 cups boiling water

2 medium red bell peppers, stems, seeds and membranes removed, cut into 1 inch pieces

3/4
lb. fresh mushrooms, preferably shiitakes

1 onion, halved and thinly sliced

1 28 oz. can plum tomatoes

2 tbsp. tomato paste

1 cup frozen peas

Salt and freshly ground pepper

Cayenne pepper


Pour the shoyu and stock into a medium bowl. Add the miso and whisk until evenly blended. Add 1/2 cup of the wine, the mirin, vinegar, canola oil, and garlic and whisk together until well combined, then stir in the bay leaf. Immediately set aside 3/4 cup of the marinade, and pour the remainder over the seitan cubes. Marinate for 30 minutes.


Preheat oven to 375 degrees. Place the porcinis in a bowl and cover with the boiling water. Set aside for 20 minutes.


Remove the seitan from the marinade and arrange it in a shallow baking dish in a single layer. Pour enough marinade over the seitan to cover halfway. Bake 30-40 minutes, or until most of the marinade has been absorbed.


Meanwhile, in a bowl, toss the red peppers with 2 tbsp. of the reserved marinade. Spread on a parchment-covered baking sheet for 40 minutes, turning once.


While the peppers roast, remove the stems from the shiitakes and cut into 1 inch chunks. Place the shiitakes in a bowl and toss with 1/2 cup of the reserved marinade. Put on a parchment-covered baking sheet and roast for 30 minutes, turning once. (DN:
The seitan, peppers, and mushrooms can be made 1 day in advance and stored all together in a covered bowl in the refrigerator.)

Remove the porcinis from the water and give them a rough chop. Reserve the liquid.


Warm the olive oil in a large heavy-bottomed pot. Add the onions and cook over medium-low heat, stirring occasionally, for 12-15 minutes or until soft.


Add the remaining 2 cups of wine, turn the heat to high, and cook until the liquid is reduced by half, about 15 minutes. Turn the heat to medium and add the tomatoes and their juice, breaking them with a spoon. Stir in the tomato paste and cook for 5 minutes.


Add the roasted peppers, mushrooms, and the seitan. Add the chopped porcini and 2 cups of the soaking liquid, being careful not to add the grit at the bottom of the bowl.


Add the peas, salt to taste, a generous sprinkle of pepper, and a generous sprinkle of cayenne. Simmer gently, uncovered, for 10 minutes to cook the peas and let the flavors marry.

Sunday, November 30, 2008

Delicious Richness


Ah, gratins. I just hear that word and I think "rich". Of course, they don't have to be. A gratin is typically some kind of layered dish that is baked in the oven. I have made healthy gratins with beans, tomatoes and homemade breadcrumbs or with lots of vegetables and no cream or cheese.

This is not one of those gratins. Leave it to Ina Garten of Barefoot Contessa fame to make the richest creamiest
cheesiest gratin I have ever had. There is no restraint here and every single calorie and gram of fat is worth it. I first made this for my clients Stephanie and Mark last Thanksgiving. As it was baking in the oven and tempting me with the unbelieveable smell of potatoes, cream and Gruyere cheese all mingling together in exquisite harmony, I resolved to make it for Thanksgiving this year. When I brought it over to them, Stephanie had to hide it from Mark so he didn't eat it before the holiday.

I am always a fan of things can be made in advance, holiday or not, and this was great two days after it had been made. Just be sure to warm it up adequately and you also might want to put the dish on a baking sheet in case any of the cream (yum!) bubbles over.


Even if you think you don't like fennel, do not skip it in this dish. It's flavor is very subtle and sweet and helps cut the richness of the dish - a little bit. Do not be tempted to scale up this recipe as I did. A little goes a long way.


Potato-Fennel Gratin

Adapted from
The Barefoot Contessa
Serves 10


Garten originally calls for russet potatoes in this dish and she suggests that you peel them. I used Yukon golds and did not peel them and the texture was perfect. I also covered the gratin for the first half of the baking so it didn't get too brown.


2 small fennel bulbs

1 yellow onion, thinly sliced

2 tbsp. olive oil

1 tbsp. unsalted butter

2 pounds Yukon Gold potatoes

2 cups plus 2 tbsp. heavy cream

2
1/2 cups grated Gruyere cheese
1 tsp. kosher salt

1/2
tsp. freshly ground black pepper

Preheat the oven to 350 degrees. Butter the inside of a 10x15x2 inch (10 cup) baking dish.


Remove the stalks from the fennel and cut the bulbs in half lengthwise. Remove the cores and thinly slice the bulbs crosswise, making approximately 4 cups of sliced fennel. Saute the fennel and onions in the olive oil and butter on medium-low heat for 15 minutes, until tender.


Thinly slice the potatoes by hand or with a mandoline. Mix the sliced potatoes in a large bowl with 2 cups of cream, 2 cups of Gruyere, salt and pepper. Add the sauteed fennel and onion and mix well.


Pour the potatoes into the baking dish. Press down to smotth the potatoes. Combine the remaining 2 tbsp. of cream and
1/2 cup of Gruyere and sprinkle on the top. Bake, covered, for 45 minutes, then remove the foil and bake for another approximately 45 minutes, until the potatoes are very tender and the top is browned. Allow to set for at least 10 minutes and serve.

(
The gratin can be made 3 days ahead and reheated at 350 degrees for about 30 minutes, covered.)

Saturday, November 29, 2008

Breton Apple Pie

Yesterday was my big boy's 4th birthday. We celebrated today by having a bunch of kids over and a couple of fire engines came by to take them for a ride. I wish I could tell you I made this adorable cake and then give you the recipe complete with instructions on how to make a fire made out of frosting, but the truth is, I bought it. However, I did make this...


A little history. As a child, I never liked Thanksgiving dinner. That was a little strange because I was far from a picky eater. I was taught to eat everything my mom served me and, being the rule-following oldest child, I did as I was taught. Thanksgiving was really tricky for me though because I never liked turkey - even as a very young child - and certainly didn't like gravy. To top it all off, we always had pumpkin and pecan pie for dessert - neither of which I like to this day. Suffice it to say that Thanksgiving was tough for me.

Once I became a vegetarian and it became "ok" for me to not eat turkey, things began to look up. Once I began to cook, it all changed. I started bringing side dishes that I wanted to eat and started making vegetarian gravy which totally changed the meal. I can eat mashed potatoes and stuffing endlessly if there is good gravy to pour over them. Once I started to bake, I would always bring some kind of "other" dessert so that I could enjoy dessert too. Some years I did chocolate, other years I did a Nutcracker Tart from
Bon Appetit, but most years I made something apple.

About a month before Thanksgiving this year, I picked up Nick Malgieri's
The Modern Baker and while paging through it, I found the recipe for Breton Apple Pie. I loved that it looked like a cake but was closer to a pie and I especially loved that he said you could make it in advance and freeze it. With so much food running through my kitchen the week of Thanksgiving, I really appreciated being able to make this and forget about it. It was, by the way, delicious.

Breton Apple Pie

Adapted from
The Modern Baker
Serves about 12


There is a scary moment right before you unmold this dessert. I looked at it and thought there was no way it was coming out of the pan, but it did beautifully. You have to work quickly to get it back to right side up so it doesn't crack too much. Just lightly put another cooling rack on top of the bottom of it, and re-invert.


APPLE FILLING

3 tbsp. unsalted butter

2 1/2 pounds Golden Delicious apples, peeled, halved, cored, and each half cut into 6 wedges

1/2
cup sugar

1 tbsp. lemon juice

1/2
tsp. ground cinnamon


BRETON DOUGH

2 sticks unsalted butter, softened

1 cup sugar

1 tsp. vanilla extract

4 large egg yolks

2 3/4 cup all-purpose flour

Egg wash: 1 large egg beaten with a pinch of salt


Equipment: One 10-inch wide and 2-inch deep layer pan, buttered and the bottom lined with a disk of parchment paper.


1. For the apple filling, melt the butter over medium heat in a pan that has a tight-fitting lid. Add the apples and sprinkle them with the sugar, lemon juice, and cinnamon. Cook the apples covered, checking them and stirring occasionally, until they are swimming in liquid, about 10 minutes. Uncover the pan and let the liquid evaporate, about 10 more minutes. Keep an eye on the apples while the liquid is evaporating, and stir occasionally to prevent the apples from scorching. Most of the apples will disintegrate while the filling is cooking, making it like a chunky applesauce. Allow to cool.


2. Meanwhile, set a rack on the lowest level of the oven and preheat to 350 degrees.


3. For the dough, combine the butter, sugar, and vanilla in the bowl of an electric mixer. Beat with the paddle on medium speed until very light, about 5 minutes. Add the egg yolks, one at a time, beating until smooth after each addition. Remove the bowl from the mixer and use a large ruber spatula to incorporate the flour.


4. Place half the dough in the bottom of the prepared pan. Using floured fingertips, press the dough evenly over the bottom of the pan and about 1 inch up the sides. Spread the cooled filling over the dough.


5. Flour remaining dough and press into a 10 inch disk on cardboard or tart pan bottom. Use a long-bladed knife or spatula to make sure the dough isn't stuck to the cardboard. Carefully slide the dough onto the filling.


6. Brush the top of the Breton with the egg wash and trace a lattice pattern on with the tines of a fork.


7. Bake the Breton until the dough is well colored and baked through, 50-55 minutes.


8. Cool on a rack in the pan for 10 minutes, then unmold and turn right side up again. Cool completely on a rack.


(
Keep the Breton loosely covered with plastic wrap at room temperature on the day it is baked. Wrap and freeze for longer storage. Defrost and bring to room temperature before serving.)

Friday, November 28, 2008

Recovery

Oh. My. God. Where to begin?

Well, let's start with the turkey, since that was the part that I was most worried about. To review, I bought 2 15 pounders and we decided to roast one and deep fry the other. Randy did a great job taking out all the innards of both turkeys and stuffing the one-to-be-roasted with onions, celery and lemons. I did not have to touch a bird! Earlier in the week, I bought 6 gallons of peanut oil for the deep fryer (at $16/gallon) and we set up a little deep frying station outside. Meanwhile, while worrying about the turkey, I made:


Stuffed mushrooms

Balsamic Glazed Cippoline Onions

Brussels Sprout Hash with Caramelized Shallots

Potato and Fennel Gratin

Leek and Mushroom Stuffing

Pecan, Chocolate, and Bourbon Pie

Breton Apple Pie


I will spare you the blow by blow and just tell you that we took the oven turkey out too early. When we went to carve it, it was clear - even to me - that is was undercooked. And so, back into the oven it went while we waited for the deep fried turkey. At this point, I had taken all the side dishes out so we could serve the kids and everything got a little cold. Fortunately, the fryer was done soon after and that turkey was a huge success by all accounts of those who ate it. Unfortunately, for the first time in I don't remember how long, I wasn't thrilled with the food I made.


Oh, the mushrooms
were a hit and were as good as I remember. The onions were also delicious and, garnished with pomegranate seeds, they looked beautiful. I used 40% milk fat cream in the gratin, so it was sinfully rich - almost too much so. It wouldn't stop me from making it again however! The apple pie was a beauty and perfectly spiced and delicious. A new recipe to me, but one I will make again and again. But the stuffing was dry and bland. Remember those brussels sprouts I bragged about? I made a slight mistake in cooking them and so they ended up tasting really bland and, well, like brussels sprouts. Almost no one ate them. And my pie had an all butter crust which wasn't flaky at all and the filling was soupy and just not good.

So, I learned. We learned. I think we will deep fry the turkey next time, no more brussels sprouts (sob!), I will go back to the Pepperidge Farm stuffing mix that my mom used for 30 years and everyone loved. I will make a green bean casserole or some such "other" green vegetable dish. I will go back to the Nutcracker Tart that has five different kinds of nuts and is served with a Cranberry and Orange Compote - a huge hit everytime I have made it. Overall the lesson learned is, don't mess with tradition.


Aside from some misgivings about the food, we had a wonderful night. We were able to squeeze all 19 adults into our dining room so it felt lovely to all be able to sit down together instead of be scattered all over the house. The kids were great and didn't destroy our basement. I loved all the people there and it was fantastic to be able to share my favorite holiday with them.


I will have recipes and photos tomorrow. No energy today!

Tuesday, November 25, 2008

Appetizers or Not?


Do you have appetizers on Thanksgiving? Appetizers in general are something I have always struggled with. If I am cooking a big dinner for a party, do I want to serve people food
before the food? Over time I have learned to go one of two directions. Either really embrace the appetizer and make something great and maybe tone down dinner a little, or serve something really simple (like olives and nuts) and really amp up the dinner. Either way, you have to serve something.

My mom always worried about the appetizer thing on Thanksgiving. She had cooked for days, so if
anyone was not starving, she was insulted. Gradually, she learned to let that go and would actually allow a little cheese plate that my friend Michelle puts together to grace the coffee table.

This year, our first year of hosting, I am having no problem serving appetizers. We have so many people coming (19 adults, 10 children) that I am not sure if I have way too much food or not enough, so I figure if everyone nibbles when they get here, we will be fine. (My husband will tell you that, if I am worried that there is not enough food, that means there is exactly 1 and half times too much.) I farmed out app duty to two friends and then, at the last minute, because I don't have enough to do, decided to make these mushrooms.


I first made these at a party that I catered back in January. A partner of one of my clients was throwing a baby shower for his daughter and asked me to make the food. It was my first big-ish party (60) and my baby was not yet 1, so this was a real challenge for me. It all turned out great and the clients were really happy. I like to think it was partly due to the mushrooms. I set out A LOT of food, and these were the first to go. Like in the first 20 minutes - just gone. The recipe comes from the people at Cook's Illustrated and you know that when they make something, they make it to death until it's perfect. These are great party food, no plate or even napkin necessary. Just pick up and eat. And repeat.

Spinach and Lemon Stuffed Mushrooms
Adapted from Cook's Illustrated

Makes 24


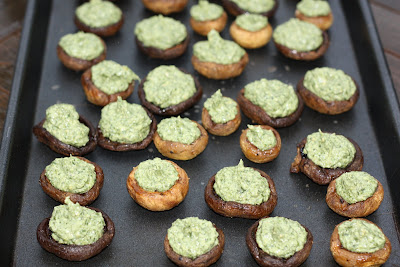
Note that the photo above is the "before" picture. You can make these up to 3 days in advance through this stage (before being dipped in bread crumbs and baked). If you are having a crowd, don't hesitate to either 1 1/2 or double this recipe. You won't be sorry. Also, choose large mushrooms, they lose a lot of their size when going through the roasting.


1/2 cup frozen spinach, defrosted and squeezed dry

1/2 cup shredded cheddar cheese

2 oz. cream cheese, softened

2 tbsp. olive oil

1 garlic clove, minced

3 tbsp. lemon juice

3 scallions, sliced thin

1/2 tsp. salt

24 large mushrooms, stems removed

1/4 cup olive oil

1 tsp. lemon juice

Salt and pepper

1/2 cup store-bought bread crumbs or panko


1. For the topping: Process first 8 ingredients in food processor until smooth. Transfer to zip-loc bag until ready to use.


2. For the mushrooms: Adjust oven rack to middle position and heat oven to 450 degrees. Line rimmed baking sheet with foil and set wire rack inside baking sheet. Toss mushrooms with oil, lemon juice, 1/4 tsp. salt and 1/8 tsp. pepper in bowl. Arrange mushrooms gill side up on rack and roast until juices are released, about 20 minutes. Turn caps over and roast until mushrooms are well browned, about 10 minutes.


3. Remove baking sheet from oven. Flip roasted mushrooms gill side up and cool slightly. Snip off one corner, then fill mushrooms. (
Mushrooms can be made to this point, up to three days ahead. Cover with plastic wrap and store in the refrigerator.)

4. Press each cap (stuffing side down) into bread crumbs and arrange (topping side up) on rack. Bake until filling is hot and topping is golden, about 10 minutes. Cool about 5 minutes before serving.