Sunday, November 30, 2008
Delicious Richness
Ah, gratins. I just hear that word and I think "rich". Of course, they don't have to be. A gratin is typically some kind of layered dish that is baked in the oven. I have made healthy gratins with beans, tomatoes and homemade breadcrumbs or with lots of vegetables and no cream or cheese.
This is not one of those gratins. Leave it to Ina Garten of Barefoot Contessa fame to make the richest creamiest cheesiest gratin I have ever had. There is no restraint here and every single calorie and gram of fat is worth it. I first made this for my clients Stephanie and Mark last Thanksgiving. As it was baking in the oven and tempting me with the unbelieveable smell of potatoes, cream and Gruyere cheese all mingling together in exquisite harmony, I resolved to make it for Thanksgiving this year. When I brought it over to them, Stephanie had to hide it from Mark so he didn't eat it before the holiday.
I am always a fan of things can be made in advance, holiday or not, and this was great two days after it had been made. Just be sure to warm it up adequately and you also might want to put the dish on a baking sheet in case any of the cream (yum!) bubbles over.
Even if you think you don't like fennel, do not skip it in this dish. It's flavor is very subtle and sweet and helps cut the richness of the dish - a little bit. Do not be tempted to scale up this recipe as I did. A little goes a long way.
Potato-Fennel Gratin
Adapted from The Barefoot Contessa
Serves 10
Garten originally calls for russet potatoes in this dish and she suggests that you peel them. I used Yukon golds and did not peel them and the texture was perfect. I also covered the gratin for the first half of the baking so it didn't get too brown.
2 small fennel bulbs
1 yellow onion, thinly sliced
2 tbsp. olive oil
1 tbsp. unsalted butter
2 pounds Yukon Gold potatoes
2 cups plus 2 tbsp. heavy cream
2 1/2 cups grated Gruyere cheese
1 tsp. kosher salt
1/2 tsp. freshly ground black pepper
Preheat the oven to 350 degrees. Butter the inside of a 10x15x2 inch (10 cup) baking dish.
Remove the stalks from the fennel and cut the bulbs in half lengthwise. Remove the cores and thinly slice the bulbs crosswise, making approximately 4 cups of sliced fennel. Saute the fennel and onions in the olive oil and butter on medium-low heat for 15 minutes, until tender.
Thinly slice the potatoes by hand or with a mandoline. Mix the sliced potatoes in a large bowl with 2 cups of cream, 2 cups of Gruyere, salt and pepper. Add the sauteed fennel and onion and mix well.
Pour the potatoes into the baking dish. Press down to smotth the potatoes. Combine the remaining 2 tbsp. of cream and 1/2 cup of Gruyere and sprinkle on the top. Bake, covered, for 45 minutes, then remove the foil and bake for another approximately 45 minutes, until the potatoes are very tender and the top is browned. Allow to set for at least 10 minutes and serve.
(The gratin can be made 3 days ahead and reheated at 350 degrees for about 30 minutes, covered.)
Saturday, November 29, 2008
Breton Apple Pie
Yesterday was my big boy's 4th birthday. We celebrated today by having a bunch of kids over and a couple of fire engines came by to take them for a ride. I wish I could tell you I made this adorable cake and then give you the recipe complete with instructions on how to make a fire made out of frosting, but the truth is, I bought it. However, I did make this...
A little history. As a child, I never liked Thanksgiving dinner. That was a little strange because I was far from a picky eater. I was taught to eat everything my mom served me and, being the rule-following oldest child, I did as I was taught. Thanksgiving was really tricky for me though because I never liked turkey - even as a very young child - and certainly didn't like gravy. To top it all off, we always had pumpkin and pecan pie for dessert - neither of which I like to this day. Suffice it to say that Thanksgiving was tough for me.
Once I became a vegetarian and it became "ok" for me to not eat turkey, things began to look up. Once I began to cook, it all changed. I started bringing side dishes that I wanted to eat and started making vegetarian gravy which totally changed the meal. I can eat mashed potatoes and stuffing endlessly if there is good gravy to pour over them. Once I started to bake, I would always bring some kind of "other" dessert so that I could enjoy dessert too. Some years I did chocolate, other years I did a Nutcracker Tart from Bon Appetit, but most years I made something apple.
About a month before Thanksgiving this year, I picked up Nick Malgieri's The Modern Baker and while paging through it, I found the recipe for Breton Apple Pie. I loved that it looked like a cake but was closer to a pie and I especially loved that he said you could make it in advance and freeze it. With so much food running through my kitchen the week of Thanksgiving, I really appreciated being able to make this and forget about it. It was, by the way, delicious.
Breton Apple Pie
Adapted from The Modern Baker
Serves about 12
There is a scary moment right before you unmold this dessert. I looked at it and thought there was no way it was coming out of the pan, but it did beautifully. You have to work quickly to get it back to right side up so it doesn't crack too much. Just lightly put another cooling rack on top of the bottom of it, and re-invert.
APPLE FILLING
3 tbsp. unsalted butter
2 1/2 pounds Golden Delicious apples, peeled, halved, cored, and each half cut into 6 wedges
1/2 cup sugar
1 tbsp. lemon juice
1/2 tsp. ground cinnamon
BRETON DOUGH
2 sticks unsalted butter, softened
1 cup sugar
1 tsp. vanilla extract
4 large egg yolks
2 3/4 cup all-purpose flour
Egg wash: 1 large egg beaten with a pinch of salt
Equipment: One 10-inch wide and 2-inch deep layer pan, buttered and the bottom lined with a disk of parchment paper.
1. For the apple filling, melt the butter over medium heat in a pan that has a tight-fitting lid. Add the apples and sprinkle them with the sugar, lemon juice, and cinnamon. Cook the apples covered, checking them and stirring occasionally, until they are swimming in liquid, about 10 minutes. Uncover the pan and let the liquid evaporate, about 10 more minutes. Keep an eye on the apples while the liquid is evaporating, and stir occasionally to prevent the apples from scorching. Most of the apples will disintegrate while the filling is cooking, making it like a chunky applesauce. Allow to cool.
2. Meanwhile, set a rack on the lowest level of the oven and preheat to 350 degrees.
3. For the dough, combine the butter, sugar, and vanilla in the bowl of an electric mixer. Beat with the paddle on medium speed until very light, about 5 minutes. Add the egg yolks, one at a time, beating until smooth after each addition. Remove the bowl from the mixer and use a large ruber spatula to incorporate the flour.
4. Place half the dough in the bottom of the prepared pan. Using floured fingertips, press the dough evenly over the bottom of the pan and about 1 inch up the sides. Spread the cooled filling over the dough.
5. Flour remaining dough and press into a 10 inch disk on cardboard or tart pan bottom. Use a long-bladed knife or spatula to make sure the dough isn't stuck to the cardboard. Carefully slide the dough onto the filling.
6. Brush the top of the Breton with the egg wash and trace a lattice pattern on with the tines of a fork.
7. Bake the Breton until the dough is well colored and baked through, 50-55 minutes.
8. Cool on a rack in the pan for 10 minutes, then unmold and turn right side up again. Cool completely on a rack.
(Keep the Breton loosely covered with plastic wrap at room temperature on the day it is baked. Wrap and freeze for longer storage. Defrost and bring to room temperature before serving.)
Friday, November 28, 2008
Recovery
Oh. My. God. Where to begin?
Well, let's start with the turkey, since that was the part that I was most worried about. To review, I bought 2 15 pounders and we decided to roast one and deep fry the other. Randy did a great job taking out all the innards of both turkeys and stuffing the one-to-be-roasted with onions, celery and lemons. I did not have to touch a bird! Earlier in the week, I bought 6 gallons of peanut oil for the deep fryer (at $16/gallon) and we set up a little deep frying station outside. Meanwhile, while worrying about the turkey, I made:
Stuffed mushrooms
Balsamic Glazed Cippoline Onions
Brussels Sprout Hash with Caramelized Shallots
Potato and Fennel Gratin
Leek and Mushroom Stuffing
Pecan, Chocolate, and Bourbon Pie
Breton Apple Pie
I will spare you the blow by blow and just tell you that we took the oven turkey out too early. When we went to carve it, it was clear - even to me - that is was undercooked. And so, back into the oven it went while we waited for the deep fried turkey. At this point, I had taken all the side dishes out so we could serve the kids and everything got a little cold. Fortunately, the fryer was done soon after and that turkey was a huge success by all accounts of those who ate it. Unfortunately, for the first time in I don't remember how long, I wasn't thrilled with the food I made.
Oh, the mushrooms were a hit and were as good as I remember. The onions were also delicious and, garnished with pomegranate seeds, they looked beautiful. I used 40% milk fat cream in the gratin, so it was sinfully rich - almost too much so. It wouldn't stop me from making it again however! The apple pie was a beauty and perfectly spiced and delicious. A new recipe to me, but one I will make again and again. But the stuffing was dry and bland. Remember those brussels sprouts I bragged about? I made a slight mistake in cooking them and so they ended up tasting really bland and, well, like brussels sprouts. Almost no one ate them. And my pie had an all butter crust which wasn't flaky at all and the filling was soupy and just not good.
So, I learned. We learned. I think we will deep fry the turkey next time, no more brussels sprouts (sob!), I will go back to the Pepperidge Farm stuffing mix that my mom used for 30 years and everyone loved. I will make a green bean casserole or some such "other" green vegetable dish. I will go back to the Nutcracker Tart that has five different kinds of nuts and is served with a Cranberry and Orange Compote - a huge hit everytime I have made it. Overall the lesson learned is, don't mess with tradition.
Aside from some misgivings about the food, we had a wonderful night. We were able to squeeze all 19 adults into our dining room so it felt lovely to all be able to sit down together instead of be scattered all over the house. The kids were great and didn't destroy our basement. I loved all the people there and it was fantastic to be able to share my favorite holiday with them.
I will have recipes and photos tomorrow. No energy today!
Tuesday, November 25, 2008
Appetizers or Not?
Do you have appetizers on Thanksgiving? Appetizers in general are something I have always struggled with. If I am cooking a big dinner for a party, do I want to serve people food before the food? Over time I have learned to go one of two directions. Either really embrace the appetizer and make something great and maybe tone down dinner a little, or serve something really simple (like olives and nuts) and really amp up the dinner. Either way, you have to serve something.
My mom always worried about the appetizer thing on Thanksgiving. She had cooked for days, so if anyone was not starving, she was insulted. Gradually, she learned to let that go and would actually allow a little cheese plate that my friend Michelle puts together to grace the coffee table.
This year, our first year of hosting, I am having no problem serving appetizers. We have so many people coming (19 adults, 10 children) that I am not sure if I have way too much food or not enough, so I figure if everyone nibbles when they get here, we will be fine. (My husband will tell you that, if I am worried that there is not enough food, that means there is exactly 1 and half times too much.) I farmed out app duty to two friends and then, at the last minute, because I don't have enough to do, decided to make these mushrooms.
I first made these at a party that I catered back in January. A partner of one of my clients was throwing a baby shower for his daughter and asked me to make the food. It was my first big-ish party (60) and my baby was not yet 1, so this was a real challenge for me. It all turned out great and the clients were really happy. I like to think it was partly due to the mushrooms. I set out A LOT of food, and these were the first to go. Like in the first 20 minutes - just gone. The recipe comes from the people at Cook's Illustrated and you know that when they make something, they make it to death until it's perfect. These are great party food, no plate or even napkin necessary. Just pick up and eat. And repeat.
Spinach and Lemon Stuffed Mushrooms
Adapted from Cook's Illustrated
Makes 24
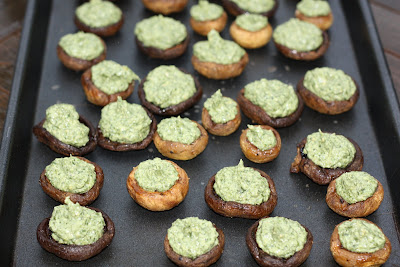
Note that the photo above is the "before" picture. You can make these up to 3 days in advance through this stage (before being dipped in bread crumbs and baked). If you are having a crowd, don't hesitate to either 1 1/2 or double this recipe. You won't be sorry. Also, choose large mushrooms, they lose a lot of their size when going through the roasting.
1/2 cup frozen spinach, defrosted and squeezed dry
1/2 cup shredded cheddar cheese
2 oz. cream cheese, softened
2 tbsp. olive oil
1 garlic clove, minced
3 tbsp. lemon juice
3 scallions, sliced thin
1/2 tsp. salt
24 large mushrooms, stems removed
1/4 cup olive oil
1 tsp. lemon juice
Salt and pepper
1/2 cup store-bought bread crumbs or panko
1. For the topping: Process first 8 ingredients in food processor until smooth. Transfer to zip-loc bag until ready to use.
2. For the mushrooms: Adjust oven rack to middle position and heat oven to 450 degrees. Line rimmed baking sheet with foil and set wire rack inside baking sheet. Toss mushrooms with oil, lemon juice, 1/4 tsp. salt and 1/8 tsp. pepper in bowl. Arrange mushrooms gill side up on rack and roast until juices are released, about 20 minutes. Turn caps over and roast until mushrooms are well browned, about 10 minutes.
3. Remove baking sheet from oven. Flip roasted mushrooms gill side up and cool slightly. Snip off one corner, then fill mushrooms. (Mushrooms can be made to this point, up to three days ahead. Cover with plastic wrap and store in the refrigerator.)
4. Press each cap (stuffing side down) into bread crumbs and arrange (topping side up) on rack. Bake until filling is hot and topping is golden, about 10 minutes. Cool about 5 minutes before serving.
Monday, November 24, 2008
Bounty
This is my vegetable basket. Sometimes, during the summer, it looks a little bit like this - stuffed to the gills with produce. But now, instead of peaches and berries, I have lots of onions, potatoes, garlic and even a pomegranate. All the makings of holiday dinner. I'm choosing to focus on this beauty rather than the two 15 pound turkeys that are in the downstairs refrigerator...
Friday, November 21, 2008
A Different Kind of Salad
I make a lot of salads for my clients. At least once a week and sometimes twice. Because of that, I am always looking for new and interesting ones to serve. I have been cooking for them for 2 1/2 years (with one six month maternity leave) and I think I have only repeated a handful of salads - and only those because they were so good.
This one might just into that "so good" category. I like a lot of "stuff" in my salad, the lettuce is there so it can be called salad, but it had better have more interesting friends in the mix. This one has an incredible balance of flavors and not a lot of lettuce, and the lettuce that is there is radicchio which is kind of the rock star of the lettuce/chicory world. The bitterness of the broccoli rabe and radicchio is balanced by the sweetness of the carrots and the honey in the dressing. As a bonus, it can be dressed in advance and looks beautiful on the plate.
Broccoli Rabe, Carrot and Radicchio Salad
Adapted from Martha Stewart Living Cookbook - The Original Classics
Serves 4
I increased the amount of dressing, but try adding half and tasting to see if there is enough for your taste. I also increased the amount of radicchio since the heads tend to be small. Stewart suggests plunging the broccoli rabe into an ice water bath but I just drained and ran very cold water over it to shock it. I also made the broccoli rabe a day ahead, wrapped in a clean kitchen towel, and refrigerated it.
Kosher salt
1 1/2 pounds broccoli rabe, tough stems removed, cut into 2 inch lengths
1 tbsp. fresh lemon juice
1 tbsp. sherry vinegar
1 tsp. honey
1 tbsp. soy sauce
2 tbsp. olive oil
Freshly ground black pepper
4 small carrots, sliced into thin strips, using a vegetable peeler
1/2 head radicchio, quartered and thinly sliced crosswise
1. Bring a large pot of salted water to boil. Add the broccoli rabe and cook, just until tender, about 2 minutes. Drain and rinse with very cold water until cool. Place on paper towels or in a kitchen towel to absorb excess moisture.
2. In a small bowl, whisk together the lemon juice, vinegar, honey, soy sauce, and olive oil. Season to taste with salt and pepper.
3. Combine the broccoli rabe, carrots, and radicchio in a medium bowl. Add the vinaigrette, toss well, and serve.
Thursday, November 20, 2008
Make Your Own Crackers
Does it seem strange that a vegetarian loves Ina Garten? She of the Barefoot Contessa and all things abundant and meaty? There is something about her style, the simplicity of the recipes that somehow yield incredibly full flavors, the generosity of her table. I find her irristable. I have four of her cookbooks, including her newest one, and I use them surprisingly frequently. Her roasted tomato soup is a favorite of my clients and the Outrageous Brownies are the best around.
Here may be another favorite. I love making crackers because they are somewhat unexpected. We here in the States are used to having almost an entire supermarket aisle of choices when it comes to crackers. Some of them are quite good but most are basically cardboard with salt. Even the good ones are really just a vehicle for cheese. But not these. These delicious and incredibly easy crackers are stars in their own right. I made them to go along with a hearty soup and a Butternut Squash Salad with Warm Cider Vinaigrette (from the same Ina cookbook).
The beauty of this kind of cracker is that the dough can be made well in advance and either refrigerated (for up to 4 days!) or frozen for a month at least. As I was making these yesterday, I kicked myself for not doubling or even tripling the recipe so I could have crackers at my fingertips thoughout the holidays.
Parmesan and Thyme Crackers
Adapted from Barefoot Contessa Back to Basics
Makes about 24 crackers
I made these crackers into squares instead of circles. Do yourself a favor and buy the pre-ground (not grated!) Parmesan cheese.
1/4 pound (1 stick) unsalted butter, at room temperature
4 oz. grated Parmesan cheese (about 1 cup)
1 tsp. minced thyme leaves
1/2 tsp. kosher salt
1/2 tsp. freshly ground black pepper
1 1/4 cup flour
In the bowl of an electric mixer fitted with the paddle attachment, cream the butter for 1 minute. With the mixer on low speed, add the Parmesan, thyme, salt, and pepper and combine. With the mixer still on low, add the flour and combine untl the mixture is in large crumbles, about 1 minute. If the dough is too dry, add 1 tsp. water.
Dump the dough onto a floured board, press it into a ball, and roll into a 9 inch log. Wrap in plastic and refrigerate for at least 30 minutes and up to 4 days.
Meanwhile, preheat the oven to 350 degrees. Cut the log into 3/8 inch rounds with a small, sharp knife and place them on a sheet pan lined with parchment paper. Bake for 22 minutes, until very lightly browned. Rotate the pan once during baking. Cool and serve at room temperature.
Wednesday, November 19, 2008
Become a Convert
Any article in a food magazine or post out in the blogosphere about brussels sprouts will start with some kind of encouragement. "You may think you don't like brussels sprouts," they will tell you, "But let me convince you to change your mind."
I was totally one of those people. I like almost every single vegetable out there, but didn't like those little cabbages. Because they aren't really a "go to" vegetable for most people, I actually hadn't really eaten them that many times. My mom never made them (probably because she knew we wouldn't eat them), friends never made them, I certainly never made them. The one time I can recall eating them in recent memory was at a friend's for Sunday dinner and I really hated the few bites I was able to choke down. They were whole and undercooked so chalky texture and foul flavor. I firmly put them in my dislike category.
Then, for some reason, last year I decided to make them for Thanksgiving. Maybe it was the article in Bon Appetit, maybe it was the addition of caramelized shallots, maybe it was the fact that the brussels sprouts themselves are thinly sliced instead of whole. I don't know - but I'm glad I branched out. These are, really truly, delicious. And yes, they will convert brussels sprouts haters - they converted my husband and he really holds on to his food aversions. My brother Michael (one of those rare individuals who love brussels sprouts) points out that anything with a bunch of butter in it tastes good, but I beg to differ. I made these yesterday to go with Vegetarian Shepherd's Pie and dialed the amount of butter way down and then were still incredibly tasty. Trust me. They will be on our table next Thursday.
Brussels Sprout Hash with Caramelized Shallots
Adapted from Bon Appetit Magazine
Serves 8
I made some changes here. I cut the amount of butter in half and upped the shallots. I also changed the method a bit. Be sure to use a big enough pan so that the sprouts get browned sufficiently. You can use a food processor to slice the sprouts - that is, if your baby didn't abscond with the feed tube pusher.
3 tbsp. butter, divided
3/4 lb. shallots, thinly sliced
Coarse kosher salt
Freshly ground black pepper
2 tbsp. apple cider vinegar
4 tsp. sugar
1 1/2 lb. brussels sprouts, trimmed
Olive oil
1/4 - 1/2 cup water
Halve brussels sprouts lengthwise. Cut lengthwise into thin slices. Set aside.
Melt 2 tbsp. butter in large skillet over medium heat. Add shallots; sprinkle with coarse kosher salt and pepper. Saute until golden, about 10 minutes. Add vinegar and sugar. Stir until brown and glazed, about 3 minutes. Scrape onto a plate and reserve. Wipe out skillet carefully with a paper towel.
Place skillet back over burner. Increase heat to medium-high. Add enough olive oil to lightly coat the bottom. Add sprouts; sprinkle with salt and pepper. Saute until brown at the edges, about 6 minutes. Add 1/4 cup water and 1 tbsp. butter. Saute until the water evaporates and sprouts are tender, adding more water if necessary. Add shallots. Season to taste with salt and pepper.
Tuesday, November 18, 2008
Chocolate Yum
Given a choice between sweet and savory, I will always choose savory. Friends ask me how I can keep baked goods in my house and my answer is simply that I am not all that tempted by them. Of course, I would love to have a cookie or brownie now and then, but I resist because I can. If there are pretzels, popcorn, chips, or even day-old french fries around however, it's all over for me. I made mashed potatoes today to put on top of a vegetarian Shepherd's pie and I caught myself licking the bowl much as someone else would do with cookie batter.
That being said, I do love my chocolate. And I really love chocolate and caramel together. And I really love toffee. When I saw that Smitten Kitchen made these cookies - I knew I had my treat for this week. I was unable to resist these and you won't be able to either. They are barely a cookie - almost no butter or flour. They are held together by eggs and chocolate, and yumminess - much like a flourless chocolate cake. I usually think nuts in cookies are a bad thing (except in these), but the walnuts added great texture and flavor.
A long time ago, I read that it is unnecessary to butter your cookie sheets when making cookies. There is so much butter in most recipes that the dough itself acts as it's own Silpat. I always follow that advice (one less step in the prep), but in this case - because there is only half a stick of butter, I would either grease them or use parchment paper, or a Silpat.
Let's talk about melting chocolate. You will often see a double boiler in recipes. A true double boiler is two pots that are roughly the same size so one can fit inside the other. Water is put in the bottom pot and things that can burn easily, like chocolate, are put in the top. You can easily re-create the effect by placing a heat-proof bowl in a pot with just a little water. Be sure that the bottom of the bowl does not touch the water and also keep the water at a simmer instead of a boil. This will prevent too much steam from coming out of the pot and potentially ruining the chocolate. Similarly, when you remove the bowl from the pot, have a towel ready and immediately wipe the bottom of the bowl to, again, keep steam from the chocolate.
Giant Chocolate-Toffee Cookies
Adapted from Bon Appetit Magazine
Makes about 18
Instead of buying individual toffee bars, I bought an 8 oz. package of Heath baking bits. This saved a little work, but the bits are very small. If you want larger pieces of toffee in your cookies, I would buy the individual bars called for below and chop them.
1/2 cup flour
1 tsp. baking powder
1/4 tsp. salt
1 lb. bittersweet (not unsweetened) or semi-sweet chocolate, chopped
1/4 cup (1/2 stick) unsalted butter
1 3/4 cups (packed) light brown sugar
4 large eggs
1 tbsp. vanilla extract
5 1.4 oz. chocolate Heath or Skor bars, coarsely chopped
1 cup walnuts, toasted, chopped
Combine flour, baking powder, and salt in small bowl; whisk to blend. Stir chocolate and butter in top of a double boiler set over simmering water until melted and smooth. Remove from over water. Cool mixture to lukewarm.
Using electric mixer, beat sugar and eggs in bowl until thick, about 5 minutes. Beat in chocolate mixture and vanilla. Stir in flour mixture, then toffee and nuts. Chill batter until firm, about 45 minutes.
Preheat oven to 350 degrees. Line 2 large baking sheets with parchment paper. Drop batter by 1/4 cupfuls onto sheets, spacing 2 1/2 inches apart. Bake just until tops are dry and cracked but cookies are still soft to touch, about 15 minutes. Cool on sheets. (Can be made 2 days ahead. Store airtight at room temperature.)
Saturday, November 15, 2008
Raising Vegetarian Kids
A while ago, a fellow blogger left a comment asking whether we are raising our children vegetarian and if so, how that is going. Because today is Saturday and I am not cooking anything so I have no photos or exciting recipes to share, I thought I would answer this question.
Before I do, let me say that I am no poster child for the vegetarian movement. I have no soapbox to stand on. It is not, and has never been, my goal to "convert" anyone. Veg is how I eat and how you eat is how you eat. My own husband is a carnivore and I have no problem with that. He eats vegetarian at home and eats meat when we are out. I am interested in giving people ideas of wonderful, healthy and delicious food that is vegetarian, not in telling people that something they choose to eat is bad.
So for now, my kids are vegetarian because that is how I cook in our home. Aside from a couple bits of charcuterie here and there, some salmon, and the turkeys that are on their way, meat doesn't come in my house. I will continue to cook vegetarian for them until they leave for college. If, somewhere along the way, they decide that they want to have a hamburger at a friend's house or order meat in a restaurant, I will be fine with that. I believe diet, like religion, is a personal matter. You can influence your children but not decide for them. For now, my older son knows not to ask for a bite of Daddy's chicken sandwich and sort of understands why his dish of noodles at school doesn't have meatballs. My younger son just eats what is put on his highchair tray - or launches it over the edge.
Until that day, I do what all moms do - feed my kids the best I can. I am fortunate that both of them are pretty good eaters. My older son is pretty adventurous and has liked olives, salad, fresh rolls with peanut sauce, etc. from about age 1. My younger son eats a lot of more quantity but is a little pickier and says "no" more. But he also likes olives and pickled ginger and vegetarian sushi. So really, I have no complaints.
Although I make fairly gourmet food for my clients, my kids eat a lot of cheese quesadillas and fake chicken nuggets. My husband comes home late enough that we don't eat as a family so I feed them something quick first. I look at their food intake over a week rather than what they have eaten in a given day. Like most moms I know, I just try and make sure that they have had some protein, some dairy (neither drink milk), some whole grains, and some fruits and vegetables. I don't stress too much about what each meal contains. I figure it all balances out. Both of my boys have been incredibly healthy (knock on wood), so I think I'm doing something right.
Friday, November 14, 2008
Starting Early
Remember when I said I wasn't going to bully you into making something? Well, in that post I strongly suggested. In this post, I'm going to have to insist. You have to make this bread for Thanksgiving.
Yes, I said the T-word. Friends, Thanksgiving is less than two weeks away and, at least at my house, it is never too soon to start preparing. Seeing as this is a non-client cooking day for me, I am going to spend some time finalizing my menu and start the shopping list.
Thanksgiving is huge this year because the torch has officially been passed. Ever since I was a baby, my mom has hosted Thanksgiving. The guest list more or less stayed the same, the menu more or less stayed the same and very occasionally the setting shifted as we moved a couple of times. Certain traditions were established. Every year my mom worried that the power was going to go out (it did one year). Every year my brother Michael and my parents' friend Tom whipped the cream in a copper bowl with a whisk (because of the year the power went out - no Kitchen Aid). Every year Tom said the turkey was dry (it never was). And so on and so on.
Last year my mom decided she was done with making Thanksgiving dinner and gave me the gift of creating new traditions in our home. Already things are going to be different. We are having many more people (21 adults, at least 8 children) and we are going to - you might want to sit down for this - deep fry a turkey. Yes, - not one but two turkeys are going to cross the threshold of my vegetarian home. Here is how I see it. Of the 21 adults coming, only 3 are vegetarian. Of the 18 carnivores, I know that at least half of them LOVE turkey. This is not a group that eats turkey because it's what you are supposed to do, they eat it because they love it. How can I, someone who loves to feed people, deny them the thing that they love?
The answer is I can't. So, turkey it is. After talking to some friends who have always done the deep-fried thing, Randy has it in his head that we have to deep fry. Because we are having so many people, I figure we should have two turkeys anyway, so we will roast one and deep fry the other. People can decide which one they like best. Here is the catch - aside from carrying them home from the grocery store, my goal is to not touch the turkeys at all. Randy assures me he has the deep frying one and Deb (who has moved - sob!), promised she would come help me with the other one. Other invited guests have offered to come help as well (I think they are nervous that I am going to try and slip a Tofurkey by them) so I think I can get away with not touching any bird.
I digress. Back to my bullying ways. I have been making this bread for Thanksgiving for about 15 years. In my family, it wouldn't be Thanksgiving without it. If you are nervous about making bread, this is a great one to start with because it is extremely forgiving and easy to work with. It also looks beautiful and has the perfect sweetness to balance what is a very savory meal. If that isn't enough to convince you, it can be made up to 2 weeks in advance and stored in the freezer. I take it out the morning of and let it thaw, still wrapped, at room temperature.
Let's talk about bread for a minute. I make mine in a Kitchen Aid mixer using first the regular blade and switching to the dough hook when it is time to knead. Of course, people have been making bread for millenia without this tool, so don't let not having a stand mixer stop you from trying it. One of the most helpful pieces of advice I have ever read came from Mollie Katzen in her Enchanted Broccoli Forest cookbook. She said that when dough has been kneaded enough - either by hand or machine - it should feel like your ear lobe.
I'm sending this to Wild Yeast's weekly Yeastspotting showcase.
Cranberry-Walnut Braid
Adapted from Bon Appetit Magazine
Makes 1 Loaf
I have had trouble finding orange extract so I use Simply Organic's Orange Flavor which is essentially orange flavored oil.
3 cups (or more) bread flour
1/4 cup sugar
2 envelopes quick-rising yeast
1 1/2 tsp. salt
1/2 cup buttermilk
2 large eggs
2 tbsp. (1/4 stick) unsalted butter, melted
1 1/2 tbsp. orange extract
1/3 cup (about) hot water (120-130 degrees F)
1 cup dried cranberries
1/2 cup coarsely chopped walnuts
1 large egg, beaten to blend (for glaze)
Stir 3 cups flour, the sugar, yeast and salt in large bowl to blend. Add buttermilk, 2 eggs, melted butter and orange extract and stir vigorously until well blended. Gradually stir in enough hot water to form soft, slightly sticky dough. Transfer dough to floured work surface. Knead dough until smooth and slightly tacky but not sticky, adding more flour if necessary, about 7 minutes. Knead in dried cranberries 1/3 cup at a time; then knead in walnuts. Form dough into ball.
Oil large bowl. Add dough to bowl, turning to coat with oil. Cover bowl with plastic wrap, then towel. Let dough rise in warm draft-free area until doubled in volume, about 1 1/2 hours.
Lightly oil large heavy baking sheet (or line with parchment paper). Punch down dough. Turn dough out onto floured surface. Divide dough into 4 equal pieces; then divide 1 piece of dough into 3 equal pieces and reserve. Using palms of hands, roll out each of remaining 3 large pieces on work surface to 13-inch long ropes. Braid ropes together. Tuck ends under and pinch together. Transfer braid to prepared baking sheet. Roll out each of the reserved 3 small dough pieces to 10-inch long ropes. Braid ropes together. Tuck ends under and pinch together. Brush large braid with some of egg glaze. Place small braid atop center of large braid. Brush small braid with some of egg glaze. Let rise uncovered in warm area until almost doubled in volume, about 1 hour 15 minutes.
Preheat oven to 325 degrees. Brush loaf again with egg glaze. Bake until loaf is deep golden brown and sounds hollow when tapped on bottom, about 45 minutes. Transfer loaf to rack and cool at least 45 minutes before slicing. (Can be made ahead. Cool completely. Wrap tightly in foil and a plastic bag and freeze for up to 2 weeks. Thaw at room temperature.)
Thursday, November 13, 2008
Pumpkin Whoopie Pies
I don't think I've ever had a whoopie pie. I don't know if I'm in the wrong generation (was it the one before me?) or if I'm on the wrong coast (is it an East coast thing?) Maybe I just have, for whatever reason, never had a whoopie pie. But that didn't stop me from making them this week as the "treat" for my clients.
This recipe comes from the new-ish cookbook Baked which I have read about on several blogs. I am currently in baking cookbook acquisition mode because I feel like all the new vegetarian ones I have seen recently feature recipes that I can find elsewhere. Elsewhere in my many many cookbooks that is. You would think that would curtail my purchasing, but no, I just buy baking books instead. Although this is my first recipe from this book, I think there will be many more to follow. One of my clients called me to tell me how much they loved these. And Randy, well, Randy went crazy for them. Think 2 pumpkin spice cakes with the tangiest cream cheese frosting between them. You get the picture.
The recipe says you will get 12 sandwich cookies but I, using a medium size ice cream scoop for the cookie part, got 20 and had a lot of filling left over. I guess I should been more generous in my frosting slathering.
Pumpkin Whoopie Pies
Adapted from Baked - New Frontiers in Baking
Makes 12 Whoopie Pies
For the Pumpkin Whoopie Pies:
3 cups all-purpose flour
1 tsp. salt
1 tsp. baking powder
1 tsp. baking soda
2 tbsp. cinnamon
1 tbsp. ground ginger
1 tbsp. ground cloves
2 cups firmly packed dark brown sugar
1 cup vegetable oil
3 cups chilled pumpkin puree
2 large eggs
1 tsp. pure vanilla extract
For the cream cheese filling:
3 cups confectioners' sugar
1/2 cup (1 stick) unsalted butter, softened
8 oz. cream cheese, softened
1 tsp. pure vanilla extract
Make the Pumpkin Whoopie Cookies:
Preheat the oven to 350 degrees.
In a large bowl, whisk the flour, salt, baking powder, baking soda, cinnamon, ginger, and cloves together and set aside.
In a separate bowl, whisk the brown sugar and oil together until combined. Add the pumpkin puree and whisk to combine thoroughly. Add the eggs and vanilla and whisk until combined.
Sprinkle the flour mixture over the pumpkin mixture and whisk until thoroughly combined.
Use a small ice cream scoop with a release mechanism to drop heaping tablespoons of the dough onto baking sheets, about 1 inch apart. Bake for 10-12 minutes, until the cookies are just starting to crack on top and a toothpick inserted into the center of a cookie comes out clean. Remove from the oven and let the cookies cool completely on the sheet while you make the filling.
Make the cream cheese filling:
Sift the confectioner's sugar into a medium bowl and set aside.
In the bowl of an electric mixer fitted with the paddle attachment, beat the butter until it is completely smooth, with no visible lumps. Add the cream cheese and beat until combined.
Add the confectioners' sugar and vanilla and beat until smooth. Be careful not to overbeat the filling, or it will lose it's structure. (The filling can be made 1 day ahead. Cover the bowl tightly and put in the refrigerator. Let the filling soften at room temperature before using.)
Assemble the whoopie pies:
Turn half the cooled whoopie pies upside down (flat side facing up.)
Using a knife or an offset spatula, drop a large dollop of filling onto the flat side of the cookie. Place another cookie, flat side down, on top of the filling. Press down slightly so that the filling spreads to the edges of the cookie. Repeat until all the cookies are used. Put the whoopie pies in the refrigerator for about 30 minutes to firm up before serving.
The whoopie pies will keep for up to 3 days, on a parchment-lined baking sheet covered with plastic wrap, in the refrigerator.
Wednesday, November 12, 2008
A Life-Changing Event
After much pleading, many letters and emails, Amazon Fresh has come to my zip code. I cannot even tell you what this means for me.
For some reason, I am having a hard time re-entering my life this week. All I did was visit L.A. for a weekend and now I can't seem to get back into the swing of things. Cooking feels like a chore instead of a joy. Each day when I put my boys down for a nap, all I want to do is put my feet up. This is unlike me. I was also almost completely unable to come up with this week's menus. Sunday night I finally just decided to plan for Tuesday and see what happened with Thursday.
Thank goodness for Amazon Fresh. Last night - when I FINALLY could think of something I wanted to make for tonight, I logged in and ordered my groceries off my list (they had everything, even tempeh.) This morning, I opened the front door and there they were. No "How am I going to get to the store with the boys to pick up that thing I forgot?" moments for me. As long as I log in before midnight, I get groceries first thing in the morning. For a busy mom and personal chef, this could be life changing...
Tuesday, November 11, 2008
Healthy and Delicious
Sometimes you just want something really really healthy. I have noticed when I need to eat some protein, I will just start to crave it. As I was planning this week's menus, I realized that I kept gravitating towards chickpeas. Now I love chickpeas - to me, they are one of the world's most perfect food - but when I start to feel like I could eat them straight out of the can...it's time for some protein.
I made this incredible salad tonight to go with a Cauliflower and Tomato Gratin and that Jerusalem Artichoke Soup. It is a favorite of mine and is a perfect protein with the chickpeas, lentils, and bulgur. I could eat bowls of this stuff - even when I'm not craving protein. I am totally in love with Goya brand chickpeas - to me they are the perfect texture and nice and buttery.
Bulgur and Green Lentil Salad with Chickpeas
Adapted from Vegetarian Cooking for Everyone
Makes 5 cups
I find this salad tastes best if it rests for a day. Don't add the mint until right before you serve it though.
1/2 cup French green lentils, picked over
1 bay leaf
Salt and freshly ground pepper
3/4 cup fine or medium bulgur
5 scallions, thinly sliced
2 garlic cloves, minced
Grated zest of 2 lemons
Juice of 2 lemons
1/4 cup olive oil
1 tsp. paprika
1 15 oz. can chickpeas, rinsed and drained
2 cups finely chopped parsley
1/4 cup chopped mint
Cover the lentils with water in a small saucepan, add the bay leaf and 1/2 tsp. salt, and bring to a boil. Lower the heat and simmer until tender but firm, about 25 minutes. Meanwhile, put the bulgur in a bowl, cover with water, and let stand until the liquid is absorbed and the grains are tender - 20-30 minutes. Drain the extra water if necessary.
Whisk together the scallions, garlic, lemon zest and juice, oil, paprika, and 1/2 tsp. salt in a large bowl. When the lentils are done, drain them and add them to the dressing. Press out any excess water from the bulgur and add it along with the chickpeas, parlsey and mint. Toss gently and thoroughly, then taste for salt and season with pepper. Serve warm or at room temperature.
Monday, November 10, 2008
Jerusalem Artichokes
A few weeks ago, we ate at the new restaurant Poppy where, I have to say, I was a little disappointed in the meal. But, I had the most incredible soup and have not been able to stop thinking about Jerusalem artichokes since. I found a recipe for a soup that sounds quite different from the one I had but no less intriguing.
This is the first time I have worked with Jerusalem artichokes which, as it turns out, have nothing to do with either Jerusalem or artichokes. They actually are part of the sunflower and look like ginger root. As I was buying the four pounds I needed for soup to feed 10, I started getting carpal tunnel just thinking about peeling all of those buggers. Thankfully, the books I consulted said to just give them a good scrub instead of a peel. Phew! I cut them into a small dice and roasted them in the oven where they proceeded to smell like french fries - always a good sign in my book.
The soup I had a Poppy had the most incredible velvety texture that can only come from time in the blender. One of my least favorite kitchen tasks (a list coming to this blog soon...), is to blend soups in the blender. Unless you wait until it completely cools down, you have to be incredibly careful that the lid of the blender doesn't blow off and spray soup all over your ceiling. Even if you don't have that lovely experience, you still end up dirtying another pot or bowl putting the blended soup into while the un-blended soup waits in the original pot - not to mention the blender. I HATE doing more dishes than absolutely necessary.
Enter the immersion blender. This wonderful tool allows you to basically stick your blender into the soup pot. The only extra thing to wash is a small wand with a blade. I have had one since 2000 and it is one of my most used kitchen tools. I use it, not only for soup, but also to crush canned tomatoes, right in the can. It's genius.
Just a few weeks ago, I got mine out to puree something and it had gone and died on me. I was actually surprised it had lasted as long as it had, seeing as I use it quite frequently. My parents bought it for me about 8 years ago, when there weren't many models on the market. Mine came from Williams-Sonoma and their name was actually on the side of the blender. I thought I would bring it back to them since I have had excellent customer service there in the past, and just see what was what. Incredibly, they could look up the records of when my parents bought it and tell me how much it cost at that time. It has been years since they have attached their name to this product so they offered me a new Breville one for the whopping price of $1 since mine originally cost $98 and this one cost $99.
I love the idea of shopping at local kitchen stores. There are two decent ones I can think of in Seattle. But with customer service like this, it's hard to walk away from Williams-Sonoma.
The one complaint I have about my spanking new immersion blender is that it is battery operated so it needs to be charged before using it. Since I don't use it that often, it's never charged when I need it. So, when I went to puree this soup today - and I was fighting daylight so I could take a picture - I ended up putting it in the blender after all. Because of the Jerusalem artichoke skins, I didn't end up with a perfectly smooth puree - even using the blender. But I always like a little bite in my soup so I didn't mind at all.
Spinach and Jerusalem Artichoke Soup
Adapted from Easy Vegetarian Cookbook
Serves 4
14 oz. Jerusalem artichokes (also called sunchokes), chopped into 3/4 inch pieces
Olive oil
Kosher salt
1 leek, white and pale green part only, thinly sliced
2 garlic cloves, finely chopped
Splash of white wine
4 cups vegetable stock
6 oz. fresh spinach
Juice of 1 lemon
1. Preheat oven to 425 degrees. On a baking sheet, toss Jerusalem artichokes with a drizzle of olive oil and a sprinkling of salt. Roast for about 15 minutes, until starting to brown.
2. Saute the leek and garlic in a little olive oil over medium heat, for 3-5 minutes, until soft but not brown. Add the white wine and continue to cook for a further 3-5 minutes, until the liquid has reduced completely
3. Add the Jerusalem artichokes and vegetable stock and simmer for 15 minutes.
4. Add the spinach and fresh lemon juice and blend - either in a blender, food processor, or with an immersion blender, and until smooth. Season to taste with salt and pepper.
Sunday, November 9, 2008
Oops
Well, in spite of my ambition to post everyday during NaBloPoMo, I missed yesterday. Truth be told, I was too busy stuffing my face with food and talking and oh yes, enjoying an 85 degree day. Actually, I was doing all of those things and spending quality time with one of my best friends and her lovely partner and their adorable son. So it really was a great weekend.
But seeing as this is a food blog, I need to tell you about a very delicious dinner that we had. The first night I was there, Karen took me to a real favorite of mine - Real Food Daily. This is a vegan mecca with two locations, and is a place where Karen and I have shared many delicious meals. Looking at the menu was a real challenge because it is huge and everything sounded incredible to me. It is very overwhelming to be a vegetarian and to be used to having one, and at the very most two, options in a restaurant - and then to suddenly have 20-30...well, it just made my head spin. I was craving something light and crunchy, so I opted for a salad which sounded great. Black beans, rice, salsa ranch dressing, guacamole, greens. What's not to love, right? I opted to add in some grilled tofu just for a little more protein which is a good thing because, in spite of how the salad sounded, it was really just a salad. Lots of lettuce and very little of everything else. I even stopped the waitress because I thought she had brought me the wrong one but no, I just mis-ordered. If the tofu hadn't been in there, I would have left the restaurant hungry. Oh well.
Last night was a very different affair. We went to Nancy Silverton's Pizzeria Mozza where there is a one month waiting list for tables. Karen and Kerry knew the inside scoop and we arrived there right at 5pm and were able to sneak three seats at the pizza bar. I had a similar menu coma to the previous night, although not everything was vegetarian - it just all sounded so damn good! They have about 15 pizzas on offer and enough various other salads and appetizers to make me glad I was there with two friends. I won't bore you with the play by play - I'll just give you the highlights.
White Bean Bruschetta - I have made many a white bean dip in my day but this one was a wonder. I don't know if they just let it spin forever in the food processor or added a lot more olive oil than I do, but the texture was exquisite. Totally melt in your mouth and perfectly seasoned. They had made a little well right in the middle of each toast and poured in about a 1/2 teaspoon of olive oil and exquisite balsamic vinegar, so in addition to the creamyness of the beans, there was the silky oil and the bite of the vinegar. Awesome! Plus they got the texture of the bread just right - crunch enough but easy to bite through. Something I have not yet perfected.
Pizza - It's a pizza joint so the pizza should be good, right? Was it ever. The crust was crisp and airy at the same time with lots of air pockets and a perfect sprinkling of salt so that getting to the end of each piece was actually the best part. We ordered a white pizza and one with brocoli rabe and olives. I am actually not a huge cheese fan, so I was a little worried about the white pizza, but it was finished with such a light hand that it was actually my favorite of the two we ordered. I loved the bitterness of the brocoli rabe contrasted with the salty olives and the creamy cheese in the other. Suffice it to say that I ate too much pizza which is a shame because I didn't save enough room to gorge on...
Butterscotch Budino - I'm a little bit at a loss for words on this one. I think that Bon Appetit ran a recipe for this and I think it is her recipe. If so, I need to immediately have a dinner party so I can make it. It was, without question, one of the best restaurant desserts I have ever had. Think light butterscotch mousse topped with perfect caramel, creme fraiche and sea salt. It was a generous portion and I was so mad at myself that I could only manage two bites. Next time, I will have one slice of pizza and one budino all to myself.
Friday, November 7, 2008
Leaving on a Jet Plane
I know I just had a weekend away, but here comes another one. In just a few minutes, I am heading to the airport to get on a flight - by myself - to sunny L.A. One of my very favorite friends lives there with her lovely partner and their little boy who I have not met. Karen is a college friend and really the only person I have stayed in touch with these many years. I am so excited to leave the rain, excited to have some girl time, excited to meet another little boy to fall in love with, but I have to tell you - right now, I am so excited to sit on a plane and read trashy magazines.
Thursday, November 6, 2008
Winter is Here
In case you are not from around these parts and don't put up with our lovely Pacific Northwest climate, allow me to tell you what fall looks like in Seattle. September is usually lovely and warm. The days are shorter but it feels like summer which is lucky seeing as our "summer" doesn't start until July 1st. In October, the leaves turn mostly yellow and we get a few of those incredible cool and crisp fall days you folks back East experience. Around the middle of the month, the temperatures start to dip and it starts to rain. Halloween can almost be a guaranteed rainy and cold night. I have lots of childhood memories of having to wear a jacket and a hood over my princess costumes. Maybe that's why I don't like to dress up on Halloween anymore.
Sometime around the beginning of November, just after we change our clocks back to standard time, some huge windstorm - accompanied by lots of rain - rips through the area taking all the changed-color leaves of the trees. And that is the end of fall. We're done, it's officially winter. Rainy, cold, and dark.
Up until very recently, I was taking all the pictures of my food outside. I know next to nothing about photography but I have read on numerous blogs that the number one enemy of food photography is your flash. It makes the food look greasy and artificial. I have been avoiding reading my camera manual and learning how to actually use this beautiful and intimidating thing but, as you can see from the above photograph, the time has come. I will actually be traveling this weekend (more on that tomorrow) and my main source of reading material is going to be that manual. Hopefully my photos will improve next week.
In the meantime, I have a recipe for you. In the two and a half years that I have been cooking for my clients, they have only ever requested repeat meals a handful of times. This is one of those meals. This will be a winner, no matter who you make it for - even people who don't like eggplant. The whole dish can be made up to a day in advance, or just parts of it can be. I have made this dish perhaps more than any other in my repetoire, and although it comes from a very reliable cookbook, I have made significant changes to the recipe over the years. The version below includes those changes.
Eggplant Rollatini with Capellini
Adapted very loosely from Vegetarian Cooking for Everyone
Serves 4-6
In my experience, it is best to use eggplants that are as long as possible. It is better to have slices that are too thick than those that are too thin. If in doubt, buy a little extra eggplant since there will no doubt be slices that don't end up working out.
For the sauce:
1 yellow onion, peeled and diced
3 garlic cloves, peeled and minced
2 28 oz. cans whole Italian tomatoes, crushed with your hand,
Kosher salt
Freshly ground black pepper
For the rollatini:
6oz. capellini or angel hair pasta
2 tbsp. olive oil
1 cup shredded provolone or mozzarella cheese
3 tbsp. freshly grated Parmesan cheese
3 tbsp. finely chopped fresh basil
3 lb. fresh eggplant
For the sauce: Heat a medium saucepan over medium heat. Add enough olive oil to coat the bottom of the pan. Add the onion and a healthy pinch of kosher salt and saute until softened, about 6 minutes. Add the garlic and saute, stirring often, for 3 more minutes. Add the tomatoes and the juice left over in the can and cook over medium-low heat, stirring occasionally, until thickened, 30-40 minutes. (Can be made two days ahead. Cool completely, cover and refrigerate.)
For the eggplant:
Preheat the oven to 375 degrees. Cut the top (stem end) off each eggplant. Cut into thin slices - somewhere between 1/3 and 1/2 inch. Don't make them too thin or they will burn. Place the slices on baking sheets and drizzle each side with olive oil. Bake in the oven for about 10 minutes per side. The eggplant should be staring to turn brown and beginning to soften when you decide to turn it over. Once done, remove slices to a rack to cool completely. (Can be made one day ahead. Stack the slices in a large container, cover, and refrigerate overnight.)
For the pasta:
Bring a large pot of salted water to boil. Add the capellini and cook, stirring frequently, until al dente - 2-3 minutes. Drain and immediately add the olive oil and cheeses. Stir well, until pasta is well coated with cheese. Set aside.
To assemble:
Preheat oven to 375 degrees. Using a 13 x 9 baking dish, spread 1 1/2 cups sauce over the bottom of the pan. Have the eggplant slices, the noodles, and the basil right in front of you. Place an eggplant slice on a work surface. Using your fingers, place a healthy pinch of noodles on the rounded end and sprinkle with a little bit of basil. Roll the eggplant up and over the noodles and place in the baking sheet, seam side down. Repeat with the remaining eggplant, noodles, and basil. Meanwhile, reheat the remaining sauce over low heat.
Cover the baking pan and cover with aluminum foil. (At this point the dish can be assembled one day ahead and refrigerated.) Place in the oven and bake until heated through - 20-25 minutes. Spoon warmed sauce over each portion.
Tuesday, November 4, 2008
Cowgirl Cookies
If you are a frequent reader of food blogs, you will often see sentences along the lines of this...
"You have got to make this."
"Stop what you are doing and make this."
"It is imperative that you make this."
"This is the best (fill in the blank) you will ever eat, so make this."
I have to admit, the rebel in me immediately decides, no I'm not going to make this. Maybe I would have if you hadn't insisted, but now that you did I won't. So there.
Keeping the above sentiment in mind, I am going to try and not use any of the example sentences on my blog...after today. These cookies? I would very strongly suggest that you make them very soon. I realize they don't look like much and truly the ingredients aren't all that sexy, but somehow through the magic of baking, they turn out to be the most perfect mouthful of deliciousness. Oats, cashews, and butterscotch chips - certainly not what I would pick in my ideal cookie (there would be lots of chocolate in that one), but every single person I have made these for goes crazy over them.
I don't know how these Cowgirl Cookies got their name, but they are from the most delightful cookbook. I have waxed poetic about Holly B's Bakery before here and I just have to say again what a magical place that bakery is. It is tiny and perfect. You walk in and will, without a doubt, want to try everything. Not just try but "eat it all up like cookie monster", as my older son is currently fond of saying. I have owned her cookbook for years and treasure it as much for the stories about her family and life on Lopez Island as I do for the amazing recipes.
On the ferry to Lopez last summer, I realized that we were parked right next to Holly as I was trying to wrestle my baby out of his car seat. She gazed at me with that wistful look of a mom of boys whose boys are grown.
"Your boys are beautiful," she said, "I have three of my own."
"Oh, I know," I said. "I have read and re-read your cookbook from cover to cover."
She seemed really happy about that.
Cowgirl Cookies
Adapted from With Love and Butter
Makes approximately 4 dozen cookies
This recipe calls for raw cashews which are unsalted and unroasted. They can be a little hard to find (Whole Foods and natural food stores carry them). Because I didn't have them this time, I just used the roasted, salted ones I had on hand and didn't add any additional salt. I also chopped them into small pieces rather than leaving them in half.
1 cup (2 sticks) unsalted butter, at room temperature
1 cup brown sugar, firmly packed
1/2 cup granulated sugar
2 eggs
1 tsp. vanilla extract
2 cups flour
3/4 tsp. baking soda
1/4 tsp. baking powder
1/2 tsp. salt
2 1/2 cups old-fashioned rolled oats
1 1/2 cups butterscotch chips
1 cup raw cashew halves
Preheat the oven to 375 degrees with the rack in the center position.
Cream the butter, brown sugar, and granulated sugar together with an electric mixer. Add the eggs and vanilla, mix, then add the flour, baking soda, baking powder, and salt. Combine thoroughly. Stir in the oats, butterscotch chips, and cashews by hand.
Using a small ice cream scoop or a tablespoon, drop the dough onto the cookie sheets, 1 inch apart. Flatten each cookie slightly with your thumb. Bake 5 minutes, rotate the pan, and continue baking 4-5 minutes. The cookies are done when caramel-brown around the edges. Cool on a wire rack and store in an airtight container.
Subscribe to:
Posts (Atom)